How to Turn Off BitLocker: Step-by-Step Guide for Windows Users
This guide explains how to turn off BitLocker encryption on Windows devices with step-by-step instructions for safe and effective decryption.

This article explains how to turn off BitLocker encryption on Windows devices, providing clear instructions for Windows 10 and 11 users. BitLocker protects data by encrypting drives, but there are situations such as device repurposing, troubleshooting, or recovery key management when disabling it becomes necessary.
Understanding the prerequisites for turning off BitLocker, including administrator rights and backup of recovery keys, is crucial before proceeding. The guide covers disabling BitLocker through Windows Settings, the command prompt, and BIOS or UEFI firmware, as well as addressing recovery key prompts and common issues that may arise.
Each method balances ease of use with technical insight, helping users decide the safest and most effective approach for their specific needs.
Before you start: What is needed to turn off BitLocker
Disabling BitLocker encryption requires preparation to ensure the process completes safely and without data loss. Administrator privileges on the Windows device are essential to access and modify BitLocker settings. Without these rights, attempts to turn off encryption will be blocked.
Access to the BitLocker recovery key or password is critical. During the decryption process, Windows may prompt for this key to verify authorization. For example, if a system detects changes in hardware or firmware, recovery key entry becomes mandatory before disabling BitLocker.
Connecting the device to a reliable power source is necessary to prevent interruptions. Decrypting a drive is a time-consuming operation, and power loss mid-process can cause data corruption or loss.
Backing up important data before proceeding is strongly recommended. Although BitLocker is designed to protect data integrity, improper decryption or unexpected errors can lead to data loss. Statistics on data loss during improper decryption are rare, but caution is advised given the potential risks.
- Confirm that the current user account has administrator privileges. If successful, BitLocker management options should be accessible in the Control Panel or Settings.
- Locate and securely store the BitLocker recovery key or password. This key is often saved to a Microsoft account, USB drive, printed document, or Azure Active Directory.
- Ensure the device is plugged into a power source and displays a charging indicator if applicable.
- Perform a full backup of critical files to an external drive or cloud storage to preserve data in case of issues during decryption.
Tip: Check the BitLocker recovery key availability in the “Manage BitLocker” section under Control Panel before starting the decryption process.
How to turn off BitLocker drive encryption using Windows Settings
Disabling BitLocker via the Windows graphical interface is the most straightforward method for most users. The steps vary slightly between Windows 10 and Windows 11 due to differences in interface layout, but both provide clear options to manage encrypted drives.
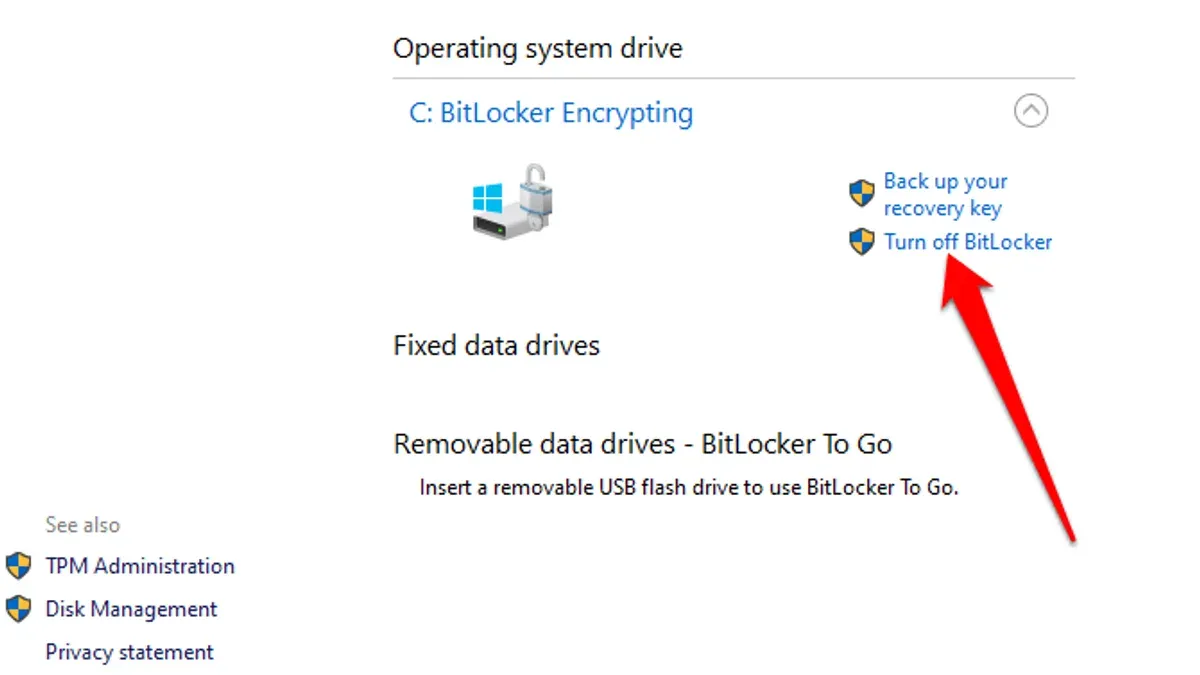
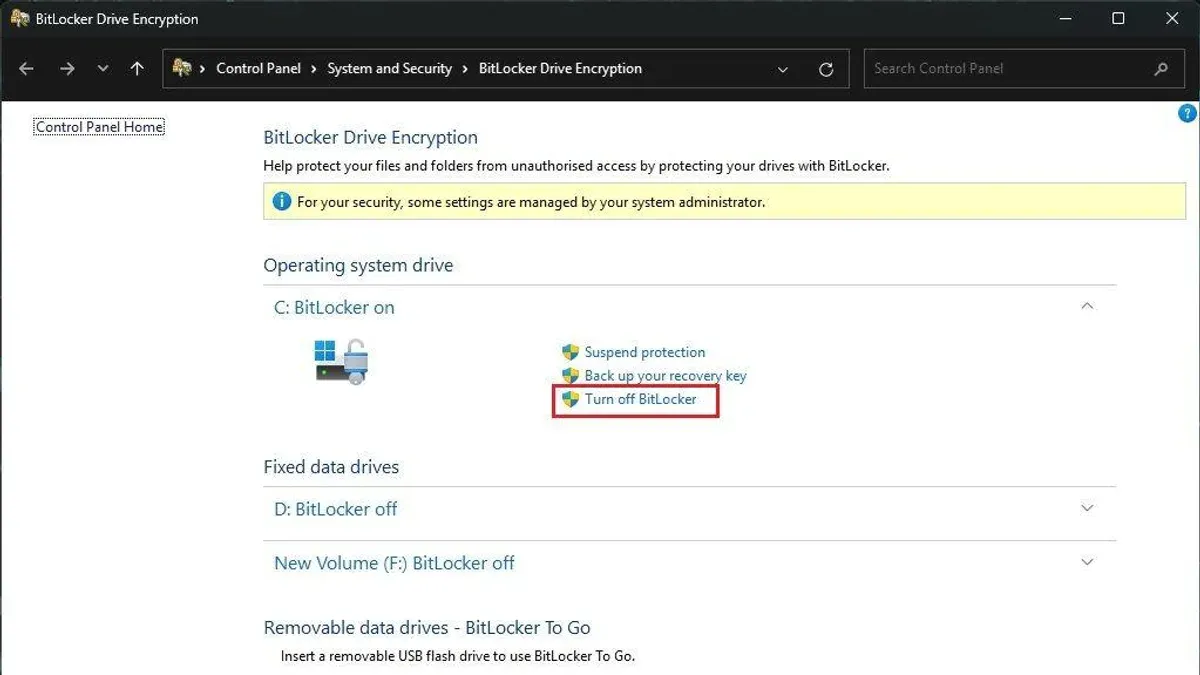
- Open the Control Panel on Windows 10 or Settings on Windows 11. In Windows 10, navigate to Control Panel > System and Security > BitLocker Drive Encryption. In Windows 11, open Settings > Privacy & Security > Device Encryption or search for "Manage BitLocker" in the Start menu to access the classic Control Panel interface.
- Select the drive encrypted with BitLocker from the list. On Windows 10, this is under "BitLocker Drive Encryption." On Windows 11, if using Device Encryption, click "Turn off device encryption" if available; otherwise, use the Control Panel route.
- Choose Turn off BitLocker (or Disable BitLocker). Windows will prompt to confirm, then begin the decryption process. Alternatively, some users may see a "Suspend protection" option, which temporarily pauses encryption without decrypting data.
- Once confirmed, Windows will decrypt the drive in the background. The time required depends on the drive’s size and speed: for example, a 256GB SSD typically completes decryption within 10 to 30 minutes, whereas a similar-sized HDD may take over an hour.
- During decryption, the drive remains accessible, but performance might be reduced. A progress indicator is shown in the BitLocker management window.
- After completion, the drive is fully decrypted, and BitLocker protection is disabled.
Tip: On Windows 11, using the Settings app for device encryption is simpler but offers fewer options than the Control Panel BitLocker management console.
How to turn off BitLocker from command prompt
For users who prefer command-line tools or require remote management, the Command Prompt offers precise control when disabling BitLocker. The primary tool is manage-bde, which allows checking encryption status and initiating decryption.
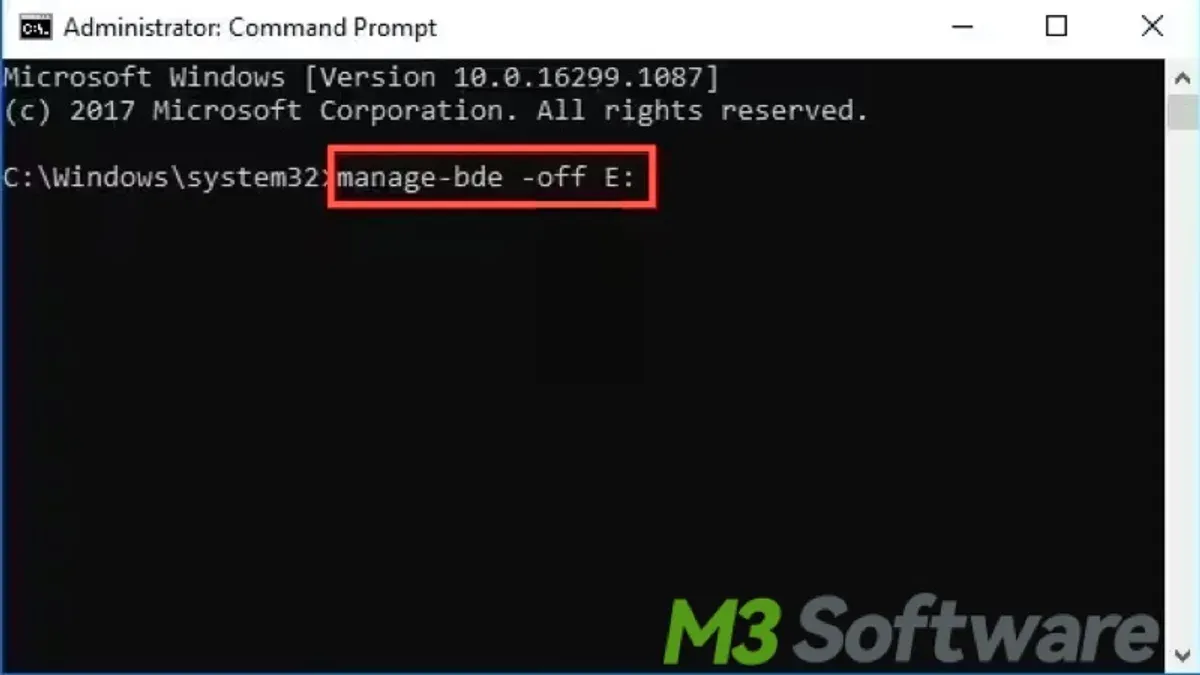
- Open Command Prompt with administrator privileges by searching for "cmd", right-clicking it, and selecting "Run as administrator." A successful launch shows a window titled "Administrator: Command Prompt."
- Check the BitLocker status of the drive by typing
manage-bde -status C:(replaceC:with the relevant drive letter). The output displays encryption percentage and protection status. For example, Percentage Encrypted: 100% indicates full encryption. - To start decrypting the drive, enter
manage-bde -off C:. This command begins the decryption process, removing BitLocker protection. - Verify progress periodically by rerunning
manage-bde -status C:. The Percentage Encrypted value will decrease as decryption proceeds. The speed depends on drive type and size but generally offers similar times to the GUI method. - Once the encryption percentage reaches 0%, BitLocker is fully disabled on the drive, and the status will read Protection Off.
The command prompt method is particularly useful for scripting, automation, or managing multiple devices remotely without GUI access. It also provides clear feedback on the decryption process.
PowerShell offers similar functionality with cmdlets like Disable-BitLocker. For example, Disable-BitLocker -MountPoint "C:" initiates decryption. PowerShell scripts can be integrated into broader system management workflows.
Tip: Running manage-bde commands in an elevated prompt is essential; otherwise, commands will fail due to insufficient permissions.
How to turn off BitLocker in BIOS or UEFI firmware settings
BitLocker encryption often relies on the Trusted Platform Module (TPM) chip integrated into the device’s BIOS or UEFI firmware for secure key storage and device authentication. Managing BitLocker through BIOS or UEFI involves adjusting TPM settings, but this is generally a last resort or part of device repurposing since improper handling can result in data loss.
Disabling TPM or clearing TPM keys without first decrypting the drive will cause BitLocker recovery prompts and may permanently lock access to encrypted data. Therefore, it is crucial to decrypt drives before altering TPM settings.
To disable BitLocker via BIOS or UEFI settings:
- Restart the computer and enter BIOS/UEFI setup using the designated key during boot (commonly F2, Del, or Esc). The exact key depends on the device manufacturer and is usually displayed briefly during startup.
- Navigate to the Security or Trusted Computing section where TPM settings are located. This area may be named “TPM Security,” “Security Chip,” or “TPM Configuration.”
- Locate the option to disable the TPM chip or clear TPM keys. On some systems, this may be labeled as “TPM State,” “Security Device Support,” or “Clear TPM.”
- Choose to disable or clear TPM keys. A confirmation prompt typically warns about data loss or recovery key requirements. Confirm only if the drive is decrypted or data backed up.
- Save changes and exit BIOS/UEFI. The system will reboot with TPM disabled or cleared.
Warning: Clearing TPM keys without decrypting BitLocker-encrypted drives first will lock the drives, requiring the recovery key to regain access. If the recovery key is lost, data recovery is not possible.
Tip: Use BIOS/UEFI TPM management only after decrypting drives or when preparing a device for secure repurposing to avoid data loss.
How to turn off BitLocker recovery key prompts
BitLocker may prompt for recovery keys frequently due to hardware changes, firmware updates, or system configuration modifications. These prompts, while vital for security, can become disruptive when triggered unnecessarily.
One effective way to reduce recovery key prompts is to temporarily suspend BitLocker before making system changes. Suspending BitLocker keeps the drive encrypted but disables protection against unauthorized changes, preventing recovery key requests during the suspension period.
- Open the Start menu and search for "Manage BitLocker."
- Click "Manage BitLocker" to open the BitLocker Drive Encryption control panel.
- Find the drive with BitLocker enabled, then click "Suspend protection." A confirmation prompt will appear.
- Confirm the suspension; the status will change to "Suspended." This indicates BitLocker will not request the recovery key during system changes.
Tip: Remember to resume BitLocker protection after completing system updates or hardware changes to maintain security.
Adjusting recovery key prompt behavior can also be done via the Group Policy Editor, especially for enterprise or advanced users. Navigate to Computer Configuration > Administrative Templates > Windows Components > BitLocker Drive Encryption and configure policies such as "Configure recovery password prompt" to reduce unnecessary prompts.
Backing up recovery keys securely remains critical. Even when prompts decrease, recovery keys should be stored safely offline or in a trusted cloud service to avoid data loss.
Users typically notice fewer recovery key prompts after suspending BitLocker during updates or adjusting Group Policy settings, improving workflow without compromising encryption.
Troubleshooting common issues when turning off BitLocker
Users disabling BitLocker often encounter errors related to missing recovery keys, corrupted drives, stalled decryption, or permission restrictions. Addressing these issues promptly ensures data integrity and successful decryption.
Handling missing recovery keys and corrupted drives
If the recovery key is missing, BitLocker will block decryption, displaying errors such as "Recovery key required" or "Unable to unlock drive." To resolve this, locate the key via the Microsoft account associated with the device, printouts, USB backups, or your organization's IT department. For corrupted drives, running the Check Disk utility (chkdsk) can detect and fix file system errors, which may restore access and allow BitLocker to disable properly.
Resolving stalled or failed decryption
Decryption may stall due to system interruptions or hardware issues. If progress halts for an extended period, verify that the device remains powered and connected. Restarting the computer can sometimes resume the process. If failures persist, use the command prompt with the command manage-bde -status to check encryption state and manage-bde -off to restart decryption.
Addressing permissions and administrative access problems
BitLocker requires administrator privileges to turn off. Errors like "Access denied" indicate insufficient rights. Running Windows Terminal or Command Prompt as an administrator resolves this. Additionally, verify Group Policy settings under Computer Configuration > Administrative Templates > Windows Components > BitLocker Drive Encryption to ensure policies do not block decryption.
When to seek professional help or use recovery tools
If errors persist after these steps, especially with drive corruption or lost keys, professional data recovery services or specialized tools may be necessary. Attempting complex recovery without expertise risks permanent data loss.
Tip: Regularly back up recovery keys and important data to avoid complications during BitLocker decryption.
Security considerations when turning off BitLocker
Disabling BitLocker encryption exposes all data on the drive to potential unauthorized access if the device is lost or stolen. Without encryption, sensitive information can be accessed directly, increasing the risk of data breaches and privacy violations. Past incidents have shown that unencrypted drives are common targets in theft-related data compromises.
Before proceeding with decryption, it is essential to back up all important data to a secure location. This precaution helps prevent permanent data loss in case of interruptions or errors during the decryption process.
For users who need temporary access without full decryption, suspending BitLocker is a safer alternative. This option maintains encryption while allowing system changes or troubleshooting without triggering recovery key prompts.
Corporate users and those subject to regulatory compliance should avoid disabling BitLocker unless explicitly authorized by their organization's security policies. Disabling encryption can violate compliance requirements and increase organizational risk.
Best practices when turning off BitLocker:
- Verify that a current backup of all critical data exists.
Successful verification means data restoration is possible if needed. - Consider suspending BitLocker instead of disabling it if the goal is temporary access or system changes.
This shows BitLocker status as "Suspended" in the Manage BitLocker Control Panel. - Confirm compliance with organizational policies or legal requirements before disabling encryption.
Approval from IT or security teams should be documented. - After disabling BitLocker, securely erase any recovery keys that are no longer needed to limit exposure.
Proper key management reduces security risks.
Further reading
- Types of Encryption: A Clear Guide to Algorithms and Applications
- How to Check If an Online Store Is Legit: A Step-by-Step Guide
- How to Check If an Email Sender Is Legit: Step-by-Step Guide
- How to Check If a Website Is Legit: A Step-by-Step Guide
Frequently asked questions
How to turn off bitlocker windows 10?
In Windows 10, turn off BitLocker by opening the Control Panel, selecting "System and Security," then "BitLocker Drive Encryption." Click "Turn off BitLocker" next to the encrypted drive and follow the prompts to decrypt the drive. This process can take some time depending on the drive size.
How to turn off bitlocker encryption?
To turn off BitLocker encryption, access the BitLocker management interface via Windows Settings or Control Panel, then choose to decrypt the encrypted drive. Decryption removes the encryption key and restores access without requiring a recovery key in the future.
How to turn off bitlocker windows 11?
Windows 11 users can disable BitLocker through the Settings app by navigating to "Privacy & Security," then "Device encryption" or "BitLocker Drive Encryption." Selecting the encrypted drive and clicking "Turn off BitLocker" initiates the decryption process.
How to turn off bitlocker encryption windows 11?
In Windows 11, open Settings, go to "Privacy & Security," then "Device encryption" or directly search for "Manage BitLocker." From there, select the encrypted drive and choose to turn off BitLocker, which decrypts the drive and disables encryption.
How to turn off bitlocker win 11?
To turn off BitLocker on Windows 11, use the Control Panel or Settings app to locate the BitLocker Drive Encryption section, select the encrypted drive, and click "Turn off BitLocker." Confirm the action to begin decrypting the drive, which may take some time.
Limits of this guide and when to seek expert help
This article does not cover turning off BitLocker on devices managed by enterprise IT policies that may restrict user permissions. In such cases, the ability to disable BitLocker encryption might be blocked or require administrative privileges beyond those available to standard users.
Additionally, this guide does not address scenarios involving hardware security modules like TPM chips malfunctioning beyond basic troubleshooting or decryption issues caused by corrupted drives.
Users unfamiliar with BIOS or UEFI settings, or those concerned about data loss, should consider consulting IT professionals before proceeding.
For the safest and most straightforward approach, the next step is to verify that all important data is backed up before beginning the BitLocker decryption process via Windows Settings or command prompt. Ensuring a reliable backup prevents potential data loss during decryption and allows recovery if complications arise.