How to Set Up Hide My Email on Apple Devices
This guide shows how to set up Hide My Email on iPhone, iPad, and Mac to protect your personal email and reduce spam.

Apple’s Hide My Email is a tool for protecting your personal email when signing up for online services. This guide explains how to set up Hide My Email on iPhone, iPad, and Mac, focusing on practical uses like managing subscriptions and reducing spam.
What is Hide My Email and Why Use It?
Hide My Email is a feature integrated with Apple ID and iCloud+ that creates unique, random email addresses forwarding messages to your personal inbox. Unlike traditional email aliases tied directly to your main address or third-party forwarding services, Hide My Email generates addresses that mask your real email without exposing it to the sender.
This method reduces spam by isolating each service’s communications, lowers phishing risks by preventing direct access to your actual email, and limits tracking by advertisers. It fits into Apple's privacy ecosystem, working alongside features like Sign in with Apple and Mail Privacy Protection.
Hide My Email requires an active iCloud+ subscription. It works on Apple devices running iOS 17, iPadOS 17, and macOS Sonoma, ensuring consistent privacy protection across your devices.
| Feature | Hide My Email | Traditional Aliases | Third-Party Forwarders |
|---|---|---|---|
| Randomized Addresses | Yes | No | Varies |
| Direct Apple Integration | Yes | No | No |
| Spam Reduction | High | Moderate | Varies |
| Tracking Prevention | Yes | No | Varies |
Step-by-Step Setup of Hide My Email on iPhone, iPad, and Mac
Prerequisites
- Apple ID signed in on your device.
- Active iCloud+ subscription (required for Hide My Email).
- Device updated to iOS 17, iPadOS 17, or macOS Sonoma.
Setting Up on iPhone and iPad
- Open the Settings app.
- Tap your name at the top, then select iCloud.
- Tap Hide My Email.
- Tap Create new address. Apple generates a random email alias.
- Label the alias based on its intended use (e.g., "Newsletter" or "Shopping Site").
- Tap Done to save.
Note: A common oversight is not labeling aliases clearly, which complicates later management. Use descriptive labels to track each alias’s purpose.
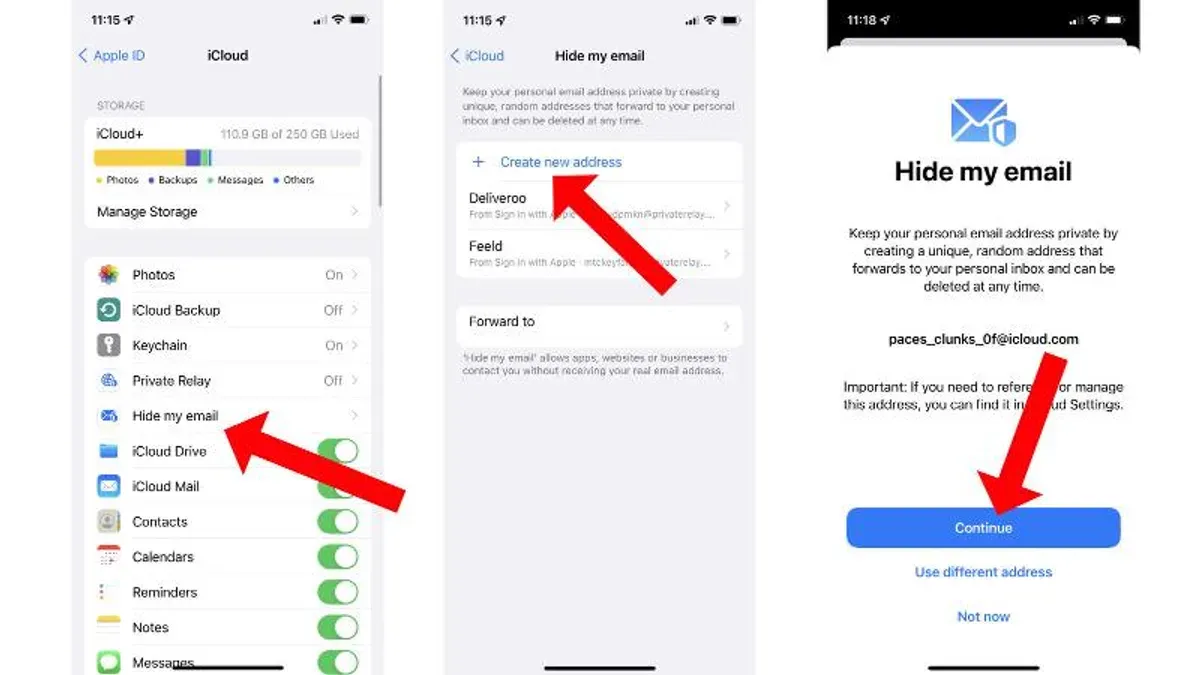
Once created, use this alias when signing up for services to keep your real email private. Incoming mail sent to this alias forwards automatically to your personal inbox.
Using Hide My Email in Mail and Safari
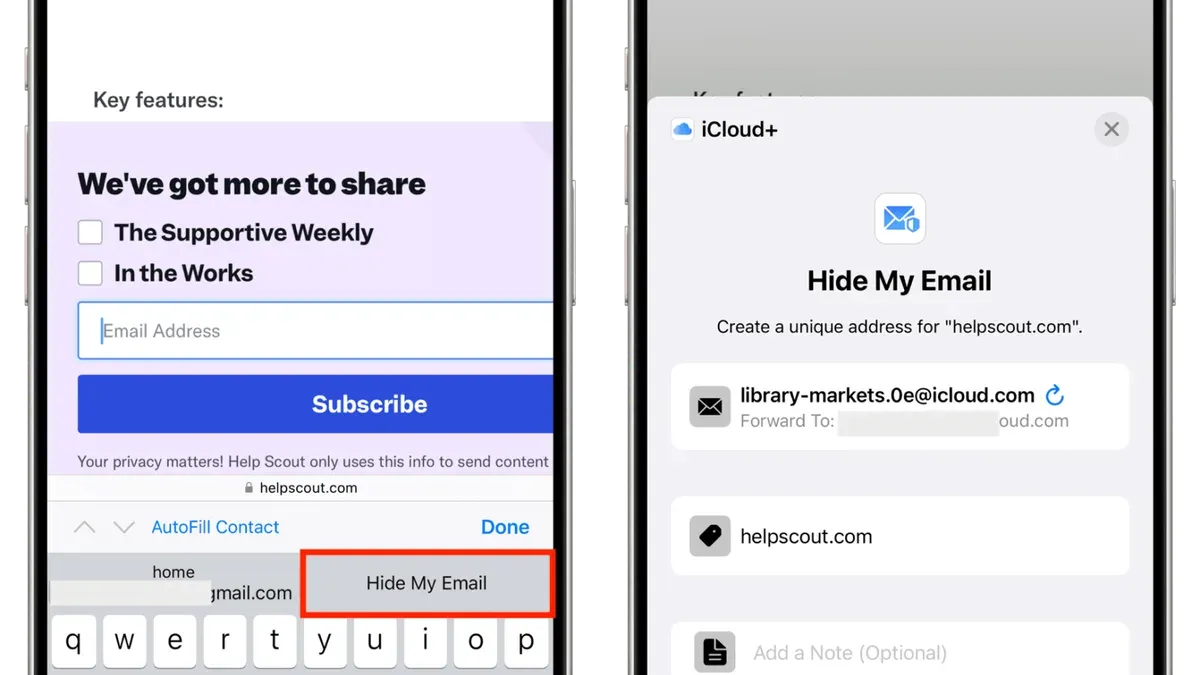
When filling out email fields in Safari or supported apps, a Hide My Email option may appear above the keyboard or as a suggestion. Tap it to use an existing alias or create a new one without leaving the app.
Creating and Managing Aliases on Mac
- Click the Apple menu and open System Settings.
- Select your Apple ID, then iCloud.
- Click Hide My Email.
- Click the + button to create a new alias.
- Provide a label and optional notes to track the alias purpose.
- Save to start using the alias.
You can edit labels, deactivate, or delete aliases here. Be aware that disabling forwarding stops emails from that alias but keeps it available for reactivation.
Disabling or Deleting Hide My Email Aliases
- Go to Hide My Email settings on any device.
- Select the alias you want to disable or delete.
- Toggle the alias off to stop forwarding emails without deleting it.
- Or choose Delete to permanently remove the alias.
Practical Use Cases: Managing Subscriptions, Online Shopping, and App Sign-Ups
Hide My Email isolates your email interactions by service, simplifying subscription management and reducing unwanted emails.
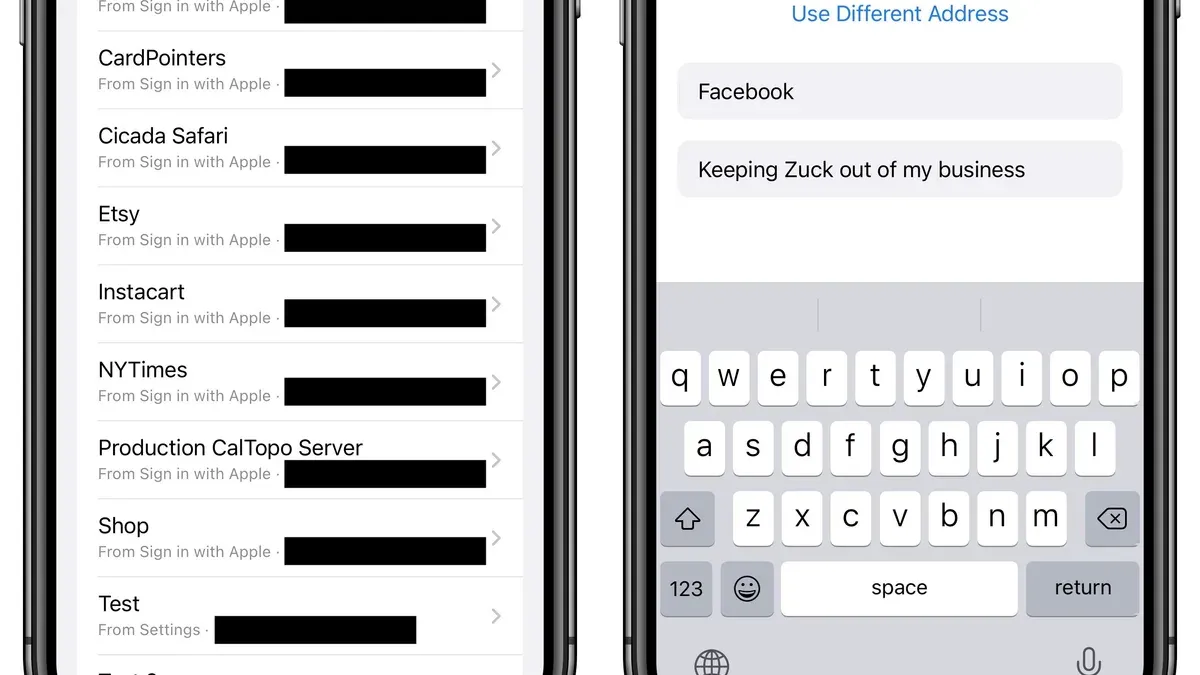
Example: Newsletter Subscription
- Create a Hide My Email alias labeled "Newsletter".
- Sign up for the newsletter using this alias.
- If the newsletter shares or sells your email, deactivate this alias without affecting your main email.
Example: E-Commerce Site
- Create an alias like "ShopXYZ" for a shopping site.
- Use this alias for order confirmations and offers.
- If you start receiving spam or unwanted promotions, disable the alias to stop future emails.
Example: Social App Signup
- Generate an alias "SocialApp" for app registrations.
- Use it to sign up and receive notifications.
- When you stop using the app or want to stop emails, deactivate the alias.
For better password and email management, link Hide My Email aliases with your password manager. This helps autofill both passwords and corresponding aliases accurately across devices.
Limitations and When Not to Use Hide My Email
- Hide My Email requires iCloud+ and is designed primarily for Apple device users; it may not work seamlessly with non-Apple platforms.
- It does not encrypt email content or replace two-factor authentication.
- Using aliases can complicate account recovery if a service requires your original email for verification.
- iCloud+ subscription costs vary; consider this before subscribing solely for this feature.
Compared to other privacy tools, Hide My Email offers strong convenience within Apple’s ecosystem but is not a comprehensive privacy solution.
Troubleshooting Common Issues and FAQs
Hide My Email Aliases Don’t Appear in Mail
Ensure your device is signed in with the correct Apple ID and has an active iCloud+ subscription. Confirm Mail app settings allow fetching from iCloud. Restarting the device often resolves syncing delays.
Recovering Access if You Lose Your Apple ID
Apple recommends setting up account recovery contacts and enabling two-factor authentication. Without Apple ID access, Hide My Email aliases cannot be managed or recovered.
Managing Alias Limits and Renewal
iCloud+ users can create hundreds of aliases, typically sufficient for most users. Aliases remain active until manually deactivated or deleted; there is no automatic expiration.
Privacy and Data Handling by Apple
Apple processes forwarded emails without reading content to maintain privacy. Hide My Email metadata helps spam filtering but is not used for targeted advertising.
Frequently asked questions
Can I use Hide My Email without an iCloud+ subscription?
No, Hide My Email requires an active iCloud+ subscription to create and manage aliases.
What happens if I disable an alias instead of deleting it?
Disabling an alias stops forwarding emails without deleting it, allowing you to reactivate it later if needed.
Will Hide My Email work on non-Apple devices?
Hide My Email aliases forward emails to your personal inbox, so you can access them on any device. However, creating and managing aliases requires Apple devices with supported OS versions.
Does Hide My Email protect against phishing?
By masking your real email address, Hide My Email reduces phishing risks but does not replace other security measures like two-factor authentication.