How to Set Up UFW Firewall on Linux: A Step-by-Step Guide
This guide explains how to set up UFW firewall on Linux with clear steps to secure your system and manage firewall rules effectively.

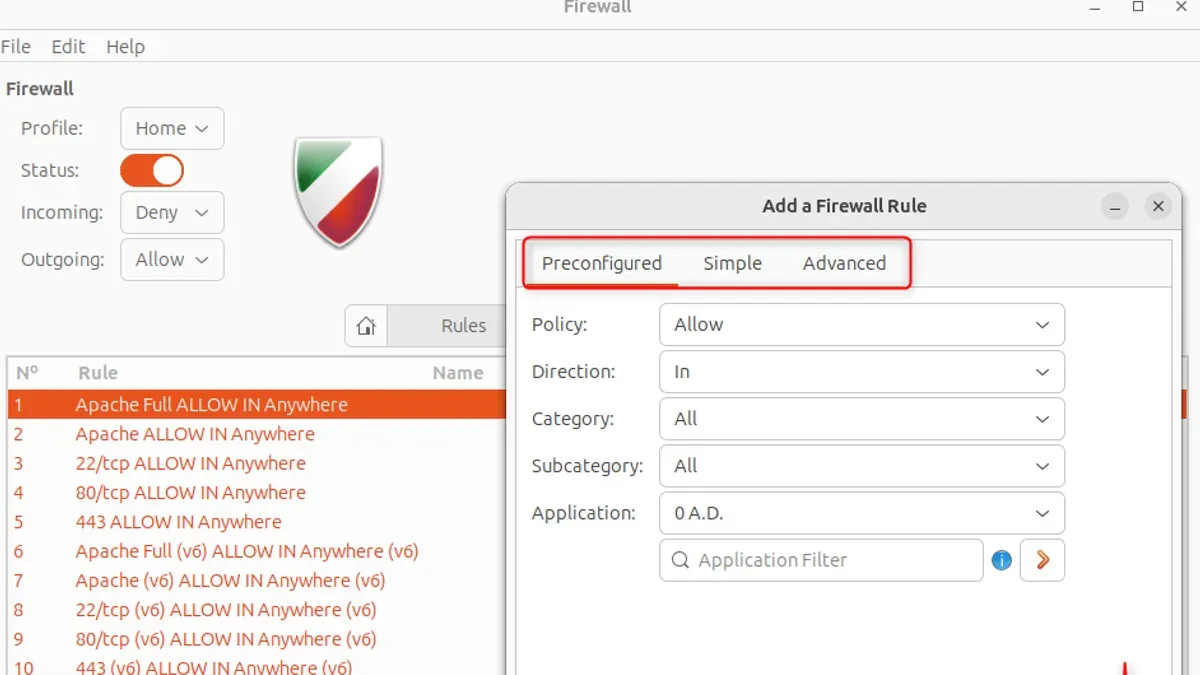
This article explains how to set up UFW firewall on Linux with a clear, step-by-step approach tailored for Linux users and system administrators. UFW (Uncomplicated Firewall) offers a straightforward way to manage firewall rules on popular Linux distributions such as Ubuntu, Debian, and Arch Linux.
The guide covers installation, enabling the firewall, and configuring rules to allow or deny traffic based on ports and IP addresses. It also includes practical examples of commands, insights into advanced configurations, and comparisons with firewalld as an alternative firewall management tool. Troubleshooting tips address common issues encountered during setup, ensuring a reliable and secure system firewall configuration.
Before you start: prerequisites for setting up UFW
Setting up UFW (Uncomplicated Firewall) requires a Linux system with either root or sudo privileges to manage firewall rules effectively. Users should have basic familiarity with the terminal or command line interface to enter commands and verify configurations.
Understanding network ports and the services running on them is essential to configure rules that allow or block traffic appropriately. This knowledge helps prevent accidentally locking out needed connections or exposing services unnecessarily.
UFW is supported on popular Linux distributions including Ubuntu, Debian, and Arch Linux, among others. Before enabling UFW, confirm that it is compatible with the system's network setup and that no conflicting firewall tools are active.
- Verify user privileges by running sudo -v; successful execution without errors indicates appropriate permissions.
- Check if UFW is installed by running ufw status; if not found, installation is required.
- Confirm the Linux distribution is supported by reviewing system information using lsb_release -a or cat /etc/os-release.
- Identify active firewall management tools to avoid conflicts, for example, by checking if firewalld is running (systemctl status firewalld).
| Feature | UFW | firewalld |
|---|---|---|
| Ease of use | Simple command-line interface with straightforward syntax | More complex, uses zones and services concepts |
| Configuration | Rule-based, suitable for most common scenarios | Dynamic and supports runtime changes without restarting |
| Target users | Beginners and administrators wanting quick setup | Advanced users requiring granular control |
Tip: Ensure no other firewall service is active to prevent rule conflicts before proceeding with UFW setup.
What is UFW firewall and what does UFW stand for
UFW stands for Uncomplicated Firewall. It serves as a user-friendly frontend for managing the complex iptables firewall framework built into Linux systems. The primary goal of UFW is to simplify firewall configuration for users who may not be familiar with the intricacies of iptables.
Developed initially by Canonical Ltd. for Ubuntu, UFW aims to provide an intuitive interface for host-based firewall setup, focusing on straightforward rule creation and management without requiring deep knowledge of low-level networking commands.
The official UFW documentation describes it as a tool designed to make managing a netfilter firewall easier or as a way to provide an interface to iptables for everyday use cases. It supports both IPv4 and IPv6 and allows users to define rules that control incoming and outgoing network traffic based on ports, protocols, and IP addresses.
By abstracting iptables commands into simpler syntax, UFW enables quick deployment of firewall rules, making it suitable for personal systems, servers, and small-scale environments where ease of use is a priority.
How to install UFW on Ubuntu, Debian, and Arch Linux
- Open a terminal with root or sudo privileges.
- Verify the installation by checking the UFW version with
ufw --version. A typical response looks likeufw 0.36or higher, confirming the tool is correctly installed.
On Arch Linux: Use sudo pacman -Sy ufw to synchronize package databases and install UFW. Arch provides the latest stable UFW version, usually above 0.36.
Example output:
resolving dependencies...
looking for conflicting packages...
Packages (1) ufw-0.37.2-1
Total Installed Size: 0.19 MiB
:: Proceed with installation? [Y/n]
On Debian: Execute sudo apt update, then sudo apt install ufw. Debian stable typically provides UFW version around 0.36, with similar installation confirmation.
Example output:
Reading package lists... Done
Building dependency tree... Done
The following NEW packages will be installed: ufw
0 upgraded, 1 newly installed, 0 to remove and 0 not upgraded.
Need to get 102 kB of archives.
After this operation, 295 kB of additional disk space will be used.
On Ubuntu: Run sudo apt update to refresh package lists, then install UFW with sudo apt install ufw. Successful installation shows "ufw is already the newest version" or installs version 0.36-6, commonly found in Ubuntu repositories.
Example output:
Reading package lists... Done
Building dependency tree... Done
ufw is already the newest version (0.36-6).
How to enable UFW firewall and verify its status
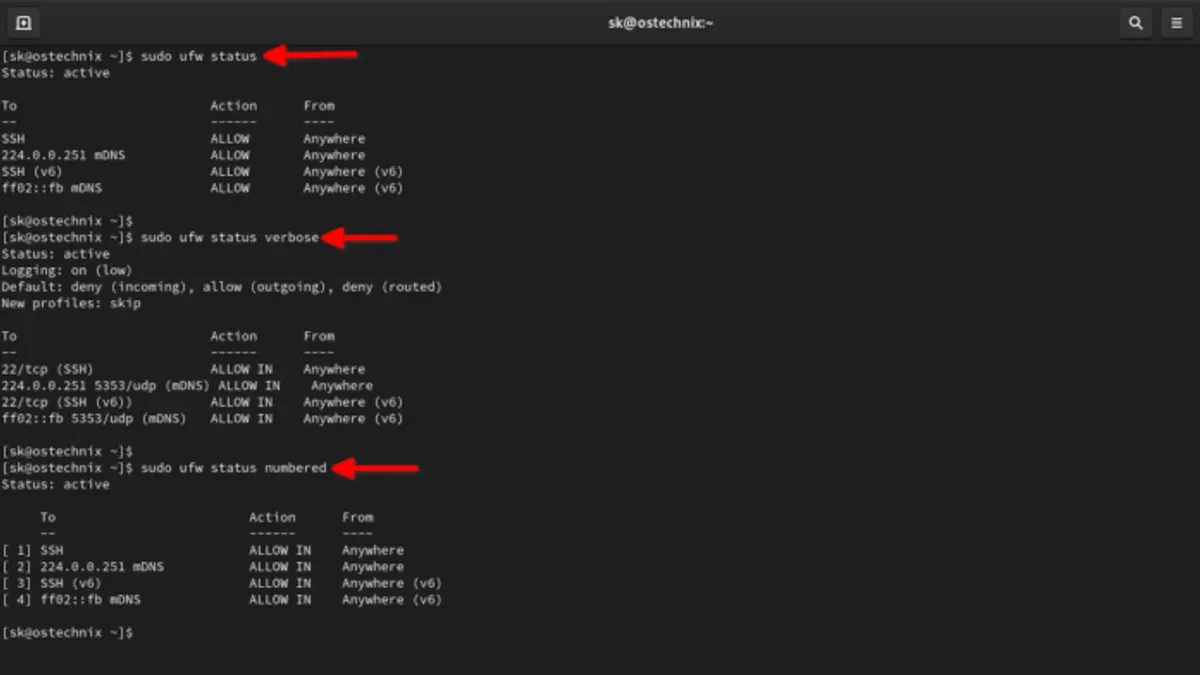
- Check the firewall status by executing sudo ufw status verbose. This command displays detailed information including whether the firewall is active, default policies, and any current rules.
Before enabling UFW, the status typically shows as
Status: inactive
with no active rules. After enabling, expect output similar to:
Status: active
Logging: on (low)
Default: deny (incoming), allow (outgoing), disabled (routed)
New profiles: skip
which confirms the firewall is running with a default deny incoming policy and logging enabled.
Run the command sudo ufw enable to activate the UFW firewall. The terminal will prompt with a confirmation message such as
Firewall is active and enabled on system startup
indicating successful activation.
When enabled, UFW applies a default deny policy for incoming connections to restrict unauthorized access while allowing outgoing traffic. Logging helps monitor firewall activity and troubleshoot issues.
Tip: Enabling UFW also configures it to start automatically on system boot, ensuring persistent firewall protection.
How to configure UFW: allowing and denying ports and IPs
- Allow a specific port globally: Run
sudo ufw allow 22to permit SSH connections. The expected output is Rule added, andufw statuswill list "22/tcp ALLOW Anywhere". - Allow a port from a specific IP address: Use
sudo ufw allow from 192.168.1.100 to any port 80to allow HTTP access only from that IP. Confirmation shows Rule added, and status displays "80/tcp ALLOW from 192.168.1.100". - Deny a port or IP: Block incoming traffic on port 25 with
sudo ufw deny 25, or deny all traffic from an IP likesudo ufw deny from 10.0.0.5. The output confirms rule addition, andufw statuswill list the deny rules accordingly. - Use service names instead of ports: UFW recognizes common service names from
/etc/services. For example,sudo ufw allow sshis equivalent tosudo ufw allow 22. This improves readability and reduces errors. - Reset UFW rules: To clear all configured rules and return to defaults, execute
sudo ufw reset. This disables UFW and deletes all rules, with a confirmation prompt before proceeding. - Disable UFW when necessary: Use
sudo ufw disableto turn off the firewall without deleting rules. The output indicates that UFW is inactive, allowing temporary suspension without reconfiguration.
Tip: When adding rules, always verify with ufw status numbered to see rule numbers for easier management and deletion.
How to use UFW commands in Linux for advanced configurations
Advanced UFW management involves commands that extend beyond basic setup, including enabling detailed logging, setting default policies, reloading rules, and reviewing comprehensive rule lists.
- Enable logging with
sudo ufw logging on. This activates logging of firewall events, which can be viewed in/var/log/ufw.log. A sample log entry looks like: Oct 5 12:00:00 hostname kernel: [UFW BLOCK] IN=eth0 OUT= MAC=... SRC=192.168.1.50 DST=192.168.1.100 LEN=60..., indicating blocked traffic details. - Set default policies using
sudo ufw default deny incomingandsudo ufw default allow outgoingto define how unspecified traffic is handled. After execution, the output confirms: Default incoming policy changed to deny. - Reload firewall rules with
sudo ufw reloadwhen changes are made outside UFW or to ensure all rules are re-applied without downtime. The command outputs Firewall reloaded on success. - Reset UFW configurations with
sudo ufw resetto clear all rules and restore defaults, useful when troubleshooting complex setups. This command prompts for confirmation and then outputs Firewall stopped and all rules deleted. - List detailed rules using
sudo ufw status numberedorsudo ufw show raw. The numbered list aids in rule management by index, while the raw output shows underlying iptables rules for in-depth inspection.
Tip: Enabling logging at the 'low' level is sufficient for most cases and avoids excessive log size; use sudo ufw logging low.
How to enable UFW in Ubuntu 22.04 and considerations for recent releases
Ubuntu 22.04 typically includes UFW pre-installed but not enabled by default. Confirming its presence can be done using sudo ufw status, which should return the firewall’s current state. By default, the firewall is inactive, allowing all incoming connections unless configured otherwise.
Ubuntu 22.04 also includes firewalld in some desktop environments or cloud images, which can conflict with UFW if both are active. It is advisable to use one firewall tool at a time to prevent rule overlaps or unexpected network behavior.
- Check if UFW is installed:
sudo ufw status. A response showing the firewall state confirms installation. - Enable UFW with
sudo ufw enable. The system will prompt that the firewall is active with default policies set. - Verify the status again using
sudo ufw status verboseto confirm UFW is active and managing connections. - Check if firewalld is running with
sudo systemctl status firewalld. If active, consider disabling it viasudo systemctl disable --now firewalldto avoid conflicts.
Tip: When enabling UFW on Ubuntu 22.04, ensure no other firewall services like firewalld are active to maintain consistent firewall behavior.
How to configure firewalld in Ubuntu as an alternative to UFW
Firewalld is a dynamic firewall manager that uses zones and services to provide flexible network security. Unlike UFW, which is a straightforward frontend to iptables with simple rule management, firewalld offers more granular control and supports runtime and permanent configurations.
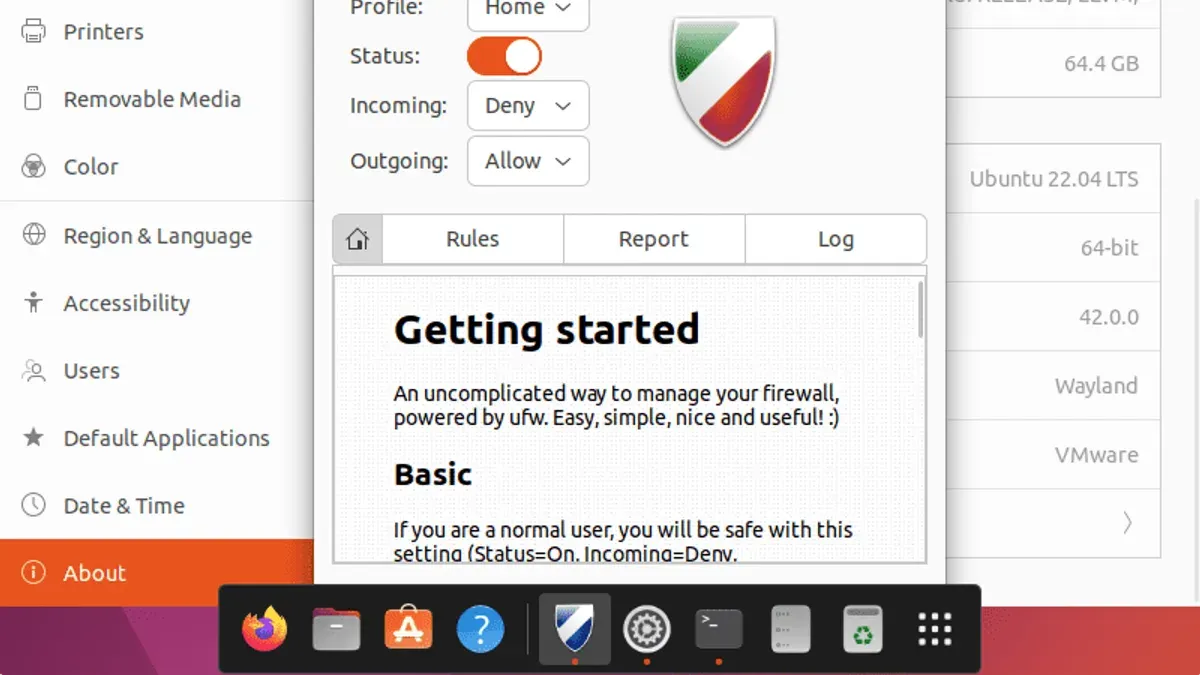
To install firewalld on Ubuntu, use the command sudo apt install firewalld. Once installed, enable and start the service with sudo systemctl enable firewalld and sudo systemctl start firewalld. Verify that firewalld is active by running sudo firewall-cmd --state, which should return "running".
Firewalld is preferable over UFW when managing multiple network interfaces with different security requirements or when needing advanced features like rich rules and direct interface to nftables or iptables.
| Feature | firewalld | UFW |
|---|---|---|
| Configuration model | Zones and services, runtime and permanent | Simple allow/deny rules |
| Ease of use | More complex, steeper learning curve | Simple and beginner-friendly |
| Runtime changes | Supports dynamic changes without restart | Requires reload for changes |
| Integration | Works with nftables and iptables backend | Primarily iptables frontend |
Troubleshooting common UFW setup issues
UFW may not enable if conflicting firewall services like firewalld are active. A common error message is "Failed to start firewall: Another firewall is running". To resolve this, disable firewalld with sudo systemctl stop firewalld and sudo systemctl disable firewalld before enabling UFW.
Sometimes, rules do not apply as expected due to syntax errors or rule conflicts. Verify rules with sudo ufw status numbered. If a rule is incorrect, delete it with sudo ufw delete [rule number] and re-add it carefully.
Prevent SSH lockout by allowing SSH before enabling UFW. Use sudo ufw allow ssh or sudo ufw allow 22/tcp first. If locked out, access via console or recovery mode to reset UFW.
Checking UFW logs helps identify blocked connections or errors. Logs are typically at /var/log/ufw.log. Use sudo tail -f /var/log/ufw.log to watch logs live and interpret blocked IPs or ports.
- Check for conflicting firewalls:
sudo systemctl status firewalldshould show inactive. - If active, disable firewalld:
sudo systemctl stop firewalldandsudo systemctl disable firewalld. - Verify UFW rules:
sudo ufw status numberedlists applied rules. - Delete incorrect rules:
sudo ufw delete [number]and re-add properly. - Ensure SSH allowed before enabling UFW:
sudo ufw allow ssh. - Enable UFW:
sudo ufw enableshould confirm activation. - Check logs for issues:
sudo tail -f /var/log/ufw.log.
Further reading
Frequently asked questions
How to install ufw in ubuntu?
To install UFW on Ubuntu, use the command sudo apt install ufw in the terminal. This installs the Uncomplicated Firewall package, which is available by default in Ubuntu's repositories. After installation, UFW can be enabled and configured as needed.
What does ufw stand for firewall?
UFW stands for Uncomplicated Firewall. It is a frontend for managing the iptables firewall, designed to simplify the process of configuring a firewall on Linux systems.
What is ufw in linux?
UFW is a user-friendly command-line interface for managing firewall rules on Linux. It provides a simplified way to configure network traffic filtering using iptables, helping secure Linux systems against unauthorized access.
How to install ufw on debian?
On Debian, UFW can be installed with the command sudo apt install ufw. Like Ubuntu, Debian includes UFW in its default package repositories, making installation straightforward.
How to enable ufw firewall?
To enable the UFW firewall, execute sudo ufw enable in the terminal. This activates UFW with the current ruleset and starts it on system boot. Checking the status afterwards with sudo ufw status confirms it is active.
Limits of this guide and when to seek other solutions
This guide does not cover complex firewall setups requiring custom iptables rules or integration with enterprise-grade security solutions. Users managing large-scale environments, needing advanced network segmentation, or coordinating with centralized security policies should consider specialized firewall management tools or consult professional security services. Additionally, scenarios involving VPN gateways, intrusion detection systems, or advanced traffic shaping extend beyond the scope of UFW's straightforward design.
For most personal and small to medium-sized server setups, UFW provides a reliable and easy-to-manage firewall solution. The most useful next step is to review and tailor firewall rules regularly, ensuring they reflect any new services or network changes, which helps maintain effective protection without unnecessary access restrictions.