Moving from Screencastify to Loom: A Practical Checklist
A practical checklist to help content creators and professionals switch from Screencastify to Loom without losing data or workflow efficiency.

This article provides a clear, practical moving from Screencastify to Loom checklist aimed at content creators, educators, and professionals seeking a seamless switch without disrupting their workflow. Understanding the differences between the two platforms is crucial before starting the transition.
Key distinctions include Loom's built-in video hosting and sharing options versus Screencastify's reliance on Google Drive integration. Exporting videos from Screencastify requires navigating to the video library, selecting each file, then choosing "Export to MP4" to ensure local backups. Setting up Loom involves installing its browser extension, creating an account, and adjusting recording settings such as camera resolution and microphone input.
Following a structured step-by-step process minimizes data loss and downtime. This guide highlights real user decision points often overlooked in generic guides to streamline the transition effectively.
What are the key differences between Screencastify and Loom?
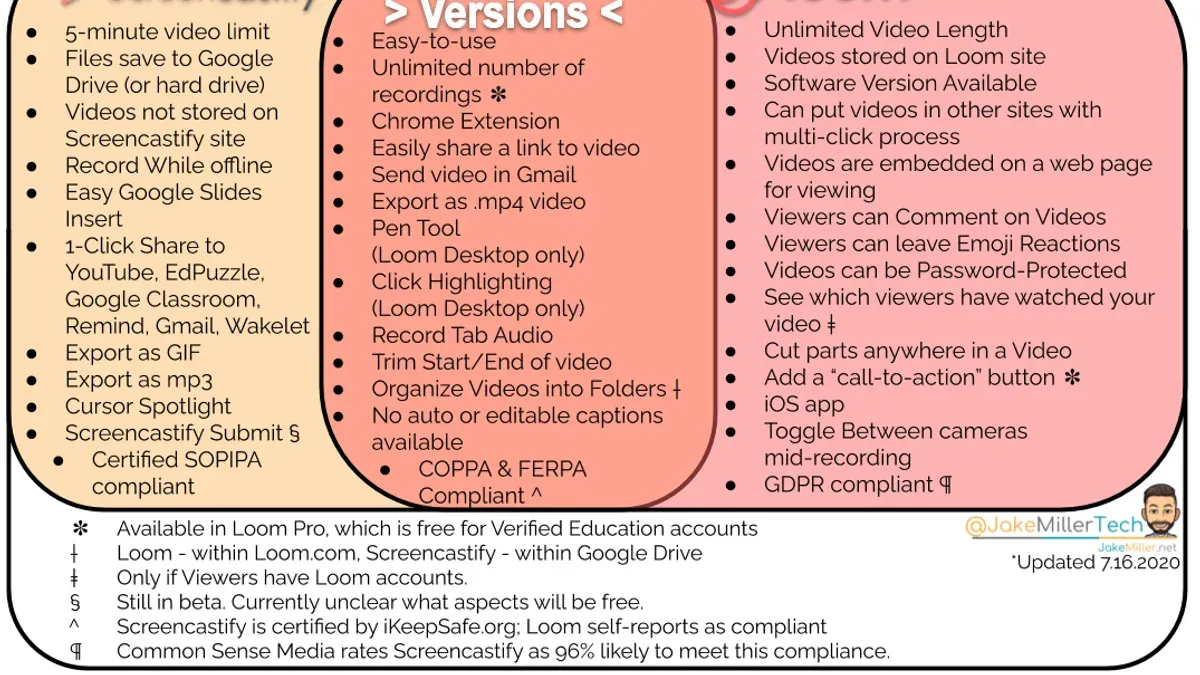
Screencastify and Loom both offer screen recording but differ notably in features, pricing, and usability. Screencastify provides robust recording options including screen, webcam, and tab capture, with straightforward trimming and annotation tools. Loom adds instant sharing and viewer engagement features like reactions and viewer insights, positioning itself as a more social tool.
User interface differences affect workflow speed. Screencastify places its controls in the browser toolbar extension with a clear step-by-step recording flow, whereas Loom uses a floating widget that can be moved anywhere on screen, offering quicker access to recording modes but potentially cluttering the workspace.
Pricing models vary: Screencastify’s free tier allows 5-minute recordings with a watermark, while paid tiers remove limits and add features like advanced editing. Loom’s free plan offers up to 5-minute videos too but includes unlimited viewers and basic engagement analytics, with paid plans unlocking longer videos and enhanced team collaboration tools.
Integration options also differ. Screencastify connects tightly with Google Drive and Google Classroom, appealing to educators. Loom integrates broadly with Slack, Notion, and various CRM platforms, supporting professional workflows. For example, a content creator moving to Loom may appreciate the direct Slack sharing button absent in Screencastify.
| Feature | Screencastify | Loom |
|---|---|---|
| Recording Modes | Screen, webcam, tab | Screen, webcam, tab |
| Editing | Basic trimming, annotations | Basic trimming, call-to-action buttons |
| User Interface | Browser extension toolbar | Floating widget |
| Free Tier Limits | 5 min, watermark | 5 min, no watermark |
| Integrations | Google Drive, Classroom | Slack, Notion, CRM tools |
How to export and back up Screencastify videos before switching?
Exporting videos from Screencastify is essential to avoid losing valuable content during the transition to Loom. Begin by logging into the Screencastify dashboard and navigating to the “My Videos” section. Select a video, click the three-dot menu on its thumbnail, and choose “Export” followed by “Save video to computer.” Repeat this for all videos intended for backup.
Organizing exported files immediately after download prevents confusion later. Create clearly labeled folders by date or topic, for example, "Project_X_September" or "Training_Sessions_October," and move all exported MP4 files into these folders. This structure facilitates easy retrieval and uploading to Loom or any other platform.
For secure storage, back up these folders to at least two locations: a local external drive and a cloud storage service such as Google Drive or Dropbox. This dual method protects against hardware failures and accidental deletions. Regularly verify the integrity of these backups by opening a sample video file to confirm it plays correctly.
Tip: When exporting, avoid selecting the “Share Link” option alone since it does not save the original file; always download the MP4 to maintain full control.
How to set up Loom for a smooth transition?
Start by creating a Loom account at loom.com using an email address associated with current workflows to maintain access consistency. After registration, install the Loom desktop app or Chrome extension, depending on the preferred device and browser setup. Navigating to Settings > Recording allows adjustment of video quality; selecting 720p balances clarity with file size, aligning with typical Screencastify exports.
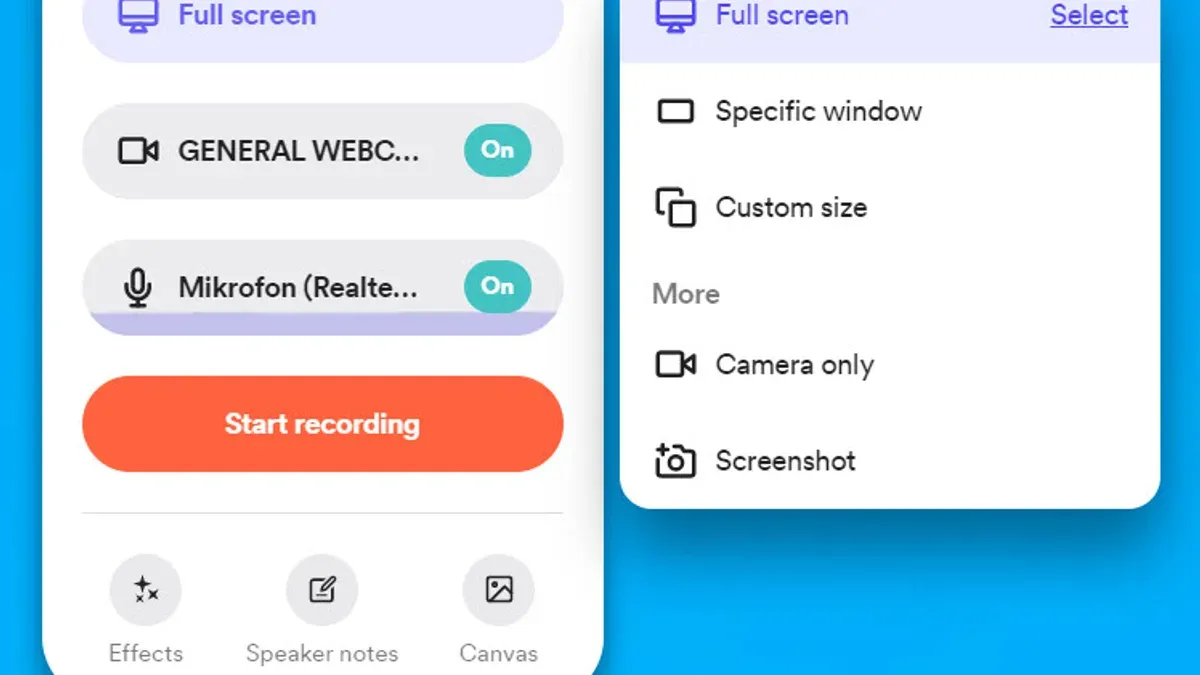
Configure default recording options by enabling or disabling webcam overlay, system audio, and microphone input to match previous Screencastify setups. For example, if Screencastify recordings used system audio and webcam, toggle these on under Settings > Recording. This avoids workflow interruptions caused by missing audio or video layers.
Importing video libraries requires manual upload since Loom doesn’t support direct import from Screencastify. Organize exported MP4s into folders reflecting project or course titles, then upload them via the Loom dashboard’s Library > Upload function. Recreating playlists or folders inside Loom mirrors earlier organization, ensuring quick retrieval.
| Setup Checklist | Location/Action |
|---|---|
| Create Loom account | loom.com/signup |
| Install Loom extension/app | loom.com/download or Chrome Web Store |
| Set video quality to 720p | Settings > Recording > Video Quality |
| Enable webcam and system audio as needed | Settings > Recording > Webcam & Audio toggles |
| Upload Screencastify MP4 files | Library > Upload |
| Create folders/playlists for organization | Library > New Folder/Playlist |
Tip: Adjust notification settings in Settings > Preferences to avoid interruptions during recordings.
How to cast off with a loom?
Starting a Loom recording begins by opening the Loom desktop app or browser extension and clicking the New Video button. Users must then select the recording mode: Screen + Camera, Screen Only, or Camera Only. For example, choosing Screen + Camera captures both the screen and webcam simultaneously, suitable for tutorials with personal commentary.
Once recording starts, controls appear as a floating toolbar that can be moved or minimized. Pressing the Pause button temporarily halts recording without ending the session, allowing for breaks or adjustments. Pressing Resume restarts recording seamlessly. To end the session, click the Stop button, which immediately saves the video to the Loom library.
Tip: Use the keyboard shortcut Alt + Shift + L (Windows) or Option + Shift + L (Mac) to toggle recording quickly without navigating the interface.
After stopping, Loom automatically processes the video and opens a shareable link in the browser. From here, videos can be renamed, trimmed, or downloaded before sharing via email or embedding. This immediate access to editing and sharing tools streamlines workflow and eliminates extra upload steps.
What common mistakes to avoid when moving from Screencastify to Loom?
Neglecting to back up Screencastify videos properly remains the most critical error. For instance, a user who skips verifying that all videos exported as MP4 files have completed downloading risks losing content if the browser closes prematurely. Always confirm file integrity before deleting original Screencastify files to prevent irreversible data loss.
Ignoring differences in video quality settings can also degrade content value. Screencastify defaults to 720p, but Loom allows up to 1080p and 4K resolutions. Failing to adjust Loom’s recording resolution under Settings > Recording Quality may result in lower-than-expected output, confusing viewers or hampering professional presentation.
Not adjusting sharing permissions in Loom causes access issues. Unlike Screencastify’s Google Drive integration, Loom requires manual permission setup via the video’s Share > Settings menu. Overlooking this step can leave collaborators locked out or expose videos publicly when privacy was intended.
Failing to inform collaborators about the switch leads to workflow disruption. A content team relying on Screencastify’s automated notifications might miss Loom’s manual sharing alerts. Communicating the transition timeline and new access processes avoids confusion and delays.
Checklist reminder: verify video backups, match video quality settings, set Loom permissions explicitly, and notify collaborators promptly.
Frequently asked questions
Can I import Screencastify videos directly into Loom?
Loom does not support direct import of videos from Screencastify. Videos must be exported from Screencastify as MP4 files and then uploaded manually to Loom through the "Upload Video" option in the Loom library. This extra step ensures video compatibility but requires organizing files locally before transfer.
Is Loom free or paid compared to Screencastify?
Both Loom and Screencastify offer free plans with limited features and paid subscriptions for additional capabilities. Loom’s free tier typically includes up to 25 videos with a maximum length of 5 minutes each, while Screencastify’s free plan allows longer recordings but may watermark videos. Choosing between them depends on specific feature needs and usage volume.
Will switching to Loom affect video quality or formats?
Video quality remains consistent as both platforms export MP4 files, a widely supported format. However, differences in default recording resolutions and compression settings may cause slight variations. Adjusting Loom’s recording settings to match Screencastify’s resolution can minimize noticeable changes in quality.
How do I manage team access when moving to Loom?
Loom provides team management features through its Business and Enterprise plans, allowing administrators to add or remove members via the "Team" settings panel. Permissions can be assigned for video viewing, editing, and sharing, helping maintain workflow control during the transition. It’s essential to set up the team structure before migrating shared content to avoid access disruptions.
What this checklist does not cover and who should look elsewhere
This checklist does not cover advanced video editing features beyond basic recording and sharing. Users who require detailed timeline editing, multi-track audio mixing, or motion graphics will need dedicated video editing software outside Loom's native capabilities. Additionally, users with highly customized Screencastify workflows, such as those integrating complex Google Workspace scripts or enterprise-level admin controls, may face additional setup complexity not addressed here.
To finalize the transition, the single most useful next step is to create a test video in Loom that replicates a typical Screencastify recording scenario. This reveals any workflow gaps early and ensures familiarity with Loom’s interface and sharing settings, such as adjusting viewer permissions via the “Share” button and enabling or disabling recording options under “Settings.” This approach prevents disruptions and smooths the path to full adoption.
See also: How to Use Signal Privacy Settings to Secure Your Conversations · How to Manage Messenger Privacy Settings for Secure Messaging · How to Control and Protect Your LinkedIn Privacy Settings