How to Password Protect an Excel File: Step-by-Step Guide
This guide explains how to password protect an Excel file across platforms, covering Windows, Mac, and online versions with step-by-step instructions.

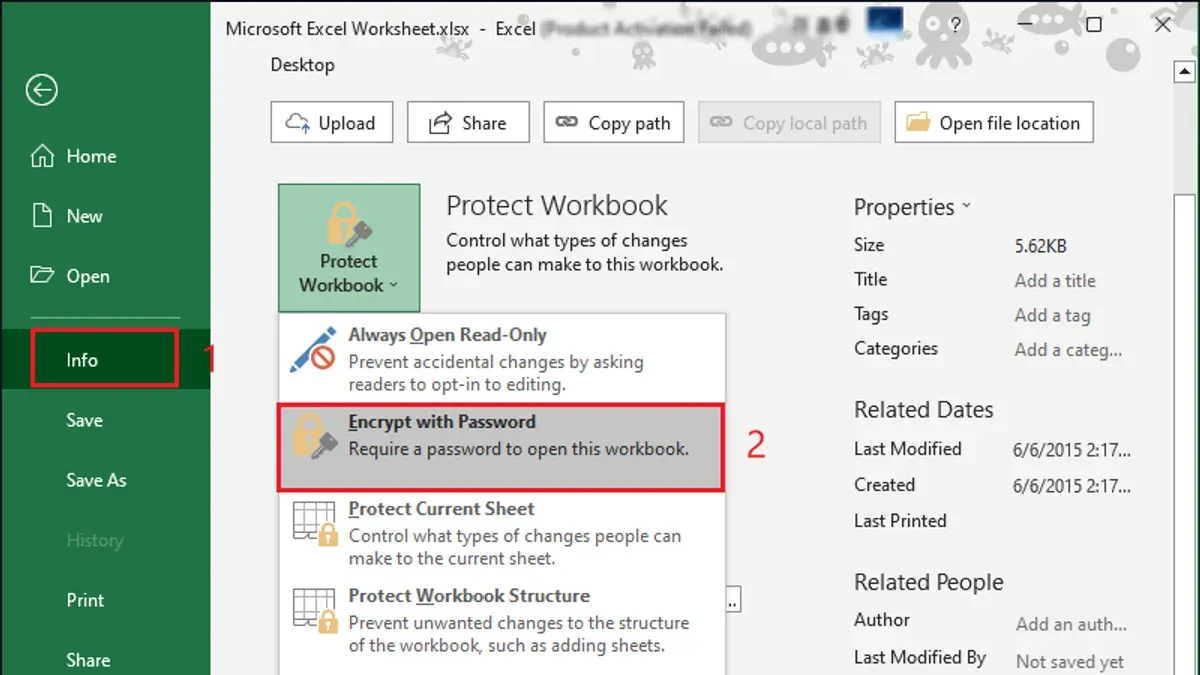
This article explains how to password protect an Excel file across various platforms and use cases.
Platform differences also matter: Windows users with Microsoft 365 can use integrated SharePoint permissions, while Mac users rely on slightly different menu paths. Online Excel versions have their own limitations and require alternative approaches. This guide covers these distinctions with step-by-step instructions and highlights permissions and potential limitations for each method.
Before you start: What is needed to password protect an Excel file
Securing an Excel file with a password requires specific software versions and understanding of file permissions. Desktop versions of Microsoft Excel provide the most comprehensive password protection features, while Excel for the web offers limited or no native password protection options.
A valid Microsoft 365 subscription or a standalone license for the desktop Excel application is necessary to access advanced password protection features such as encrypting files or restricting editing. Access to cloud services like OneDrive or SharePoint is required for managing password protection in collaborative environments.
Basic knowledge of password management and file permissions can prevent accidental lockouts and ensure proper access control. Creating backup copies of files before applying passwords is recommended to avoid data loss if the password is forgotten or corrupted.
| Excel Version | Password Protection for Opening | Password Protection for Editing | Cloud Integration |
|---|---|---|---|
| Excel Desktop (Microsoft 365 or Standalone) | Yes | Yes | Supports OneDrive and SharePoint |
| Excel for the Web | No native support | Limited (via SharePoint Permissions) | Fully integrated |
| Excel for Mac | Yes | Yes | Supports OneDrive |
- Confirm installation of Microsoft Excel desktop version (Microsoft 365 or standalone license). The application should open without errors.
- Verify access to cloud storage services such as OneDrive or SharePoint if using online collaboration features. Files should be accessible and editable within these services.
- Ensure a backup copy of the Excel file exists in a secure location to prevent data loss. The backup file should open without password protection.
- Familiarize with the Excel interface, especially the File > Info > Protect Workbook menu where password options are located. The menu should display password protection options.
Tip: Password protection in Excel is case-sensitive, so keep track of exact capitalization when creating passwords.
How to password protect an Excel file from opening
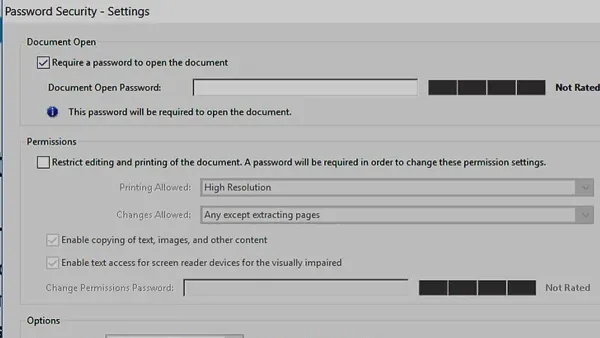
Setting a password to open an Excel file restricts access entirely, preventing unauthorized users from viewing its contents. This method uses strong encryption to secure the file, but if the password is lost, the file cannot be recovered.
- Open the Excel file on a desktop version (Windows or Mac).
- Click File in the top menu, then select Info.
- Choose Protect Workbook and then click Encrypt with Password.
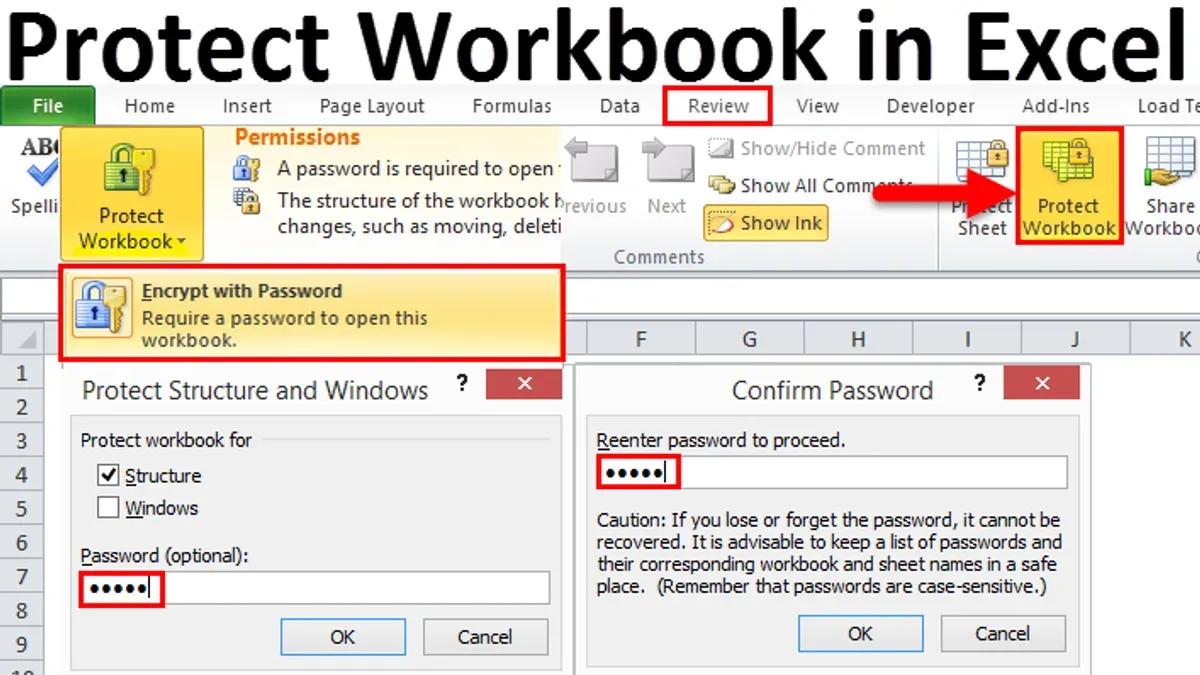
- Enter a strong password in the prompt and click OK. Re-enter the password to confirm and click OK again.
- Save the file to apply the password protection.
Once set, Excel uses AES 128-bit encryption or stronger to secure the file. Opening the file will require the password every time, effectively blocking unauthorized access. If the password is forgotten or lost, there is no built-in recovery option, so keeping a secure backup of the password is critical.
Excel for the web does not support setting a password to open a file directly, so this method requires the desktop application.
Tip: Choose a complex password combining letters, numbers, and symbols, and store it securely using a password manager or physical secure note.
How to password protect an Excel file to edit
Excel allows setting a separate password to restrict editing while permitting users to open and view the file. This is done through the 'Password to modify' option in desktop versions, which is different from the 'password to open' that prevents file access entirely.
- Open the Excel file in the desktop application.
- Click File > Save As and choose a location.
- In the Save As dialog, click Tools (next to the Save button) and select General Options.
- In the General Options window, enter a password in the Password to modify field.
- Optionally, check the box for Read-only recommended to prompt users to open the file as read-only by default.
- Click OK, re-enter the password to confirm, then save the file.
When opening the file, users without the modify password can open it in read-only mode but cannot save changes over the original file. Users entering the correct modify password gain full editing rights.
| Access Level | Requires Password | Capabilities |
|---|---|---|
| Open file | No | View contents, no editing |
| Edit file | Yes (Modify password) | Edit, save changes |
Tip: This method is best for single-user control or limited sharing; it does not prevent authorized users from copying content or bypassing restrictions in collaborative environments.
In platforms like SharePoint or Microsoft 365, this password-to-modify protection may not apply consistently due to cloud synchronization and permission settings. For collaborative environments, managing editing rights via platform-specific permissions is more reliable.
How to password protect an Excel file but allow read only
To let users open an Excel file without editing it unless they have a password, the file can be marked as read-only recommended with a password to modify. This method encourages users to open the workbook in read-only mode by default, while requiring a password for full editing access.
- Open the Excel file in the desktop app.
- Click File > Save As.
- In the Save As dialog, click Tools (next to the Save button) and select General Options.
- In the General Options window, enter a password in Password to modify and check the box for Read-only recommended. Click OK.
- Save the file with these settings. Users opening the file will see a prompt advising them to open as read-only unless they enter the modify password.
- Optionally, add a note in the workbook or file properties informing users about the read-only status and editing restrictions.
Users opening this file without the modify password can view it but cannot save changes over the original file unless they save a copy. This setup is useful when sharing reports or reference data that should not be altered.
Tip: To reinforce read-only access, consider protecting the worksheet and workbook structure under the Review tab, but remember this is not foolproof.
This method is effective for casual protection but can be bypassed by users who save a copy or use certain tools to remove passwords. For higher security, file encryption or managed permissions via SharePoint or Microsoft 365 are recommended.
For example, a manager sharing a monthly sales report can set the file as read-only recommended with a modify password. Recipients can open and review the data but must enter the password to edit, reducing accidental changes.
How to password protect an Excel file on Mac
Microsoft Excel for Mac supports password protection for opening and modifying files, but the interface and some features differ from Windows versions. Passwords can be set using the Info pane or during the Save As process.
- Open the Excel file to protect.
- Click File in the menu bar and select Passwords.
- Choose Password to open to require a password for file access. Enter the password, confirm it, then click Set Password. A confirmation message will appear.
- Alternatively, select Password to modify to restrict editing without a password, allowing read-only access otherwise. Enter and confirm the password, then click Set Password.
- Click Save to apply the changes.
Tip: On Mac, password dialogs appear as separate modal windows rather than integrated panes, which can be missed at first.
Excel for Mac does not offer as granular permission settings as Windows, and some advanced protection features, like IRM (Information Rights Management), are unavailable.
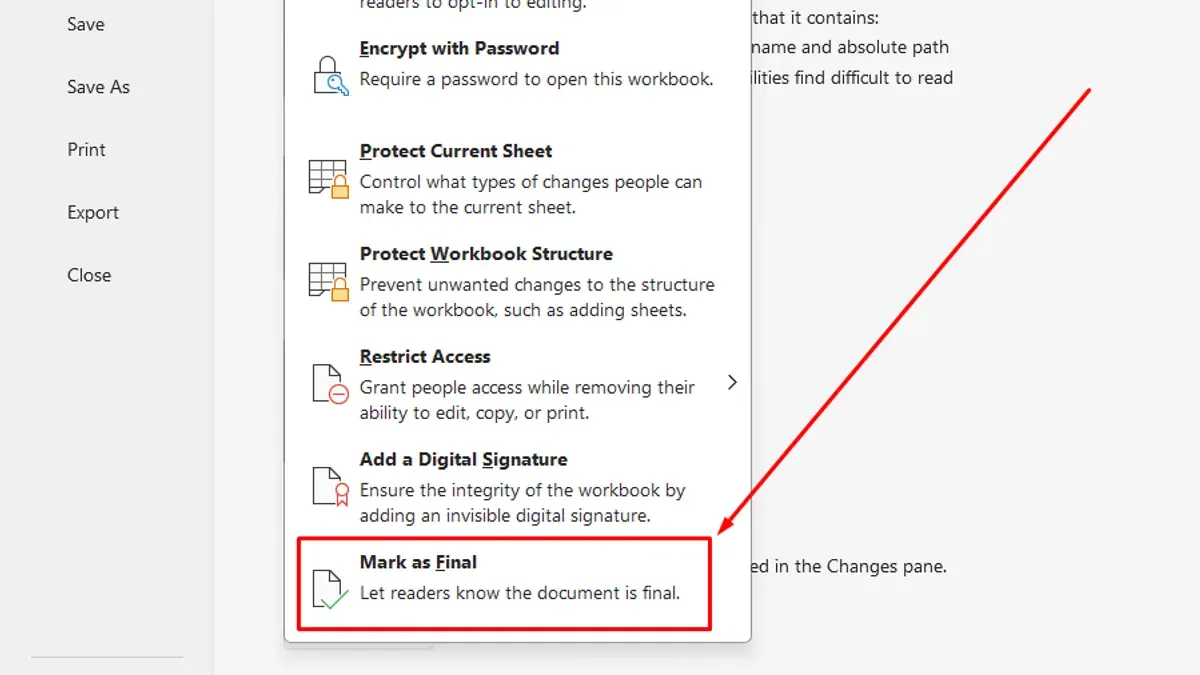
When sharing password-protected files between Mac and Windows users, passwords set on Mac are compatible, but some Windows-only features like 'Mark as Final' do not carry over.
Known limitations include occasional issues with password prompts not appearing if multiple files are open, requiring a restart of Excel, and less support for cloud-based permission management compared to Microsoft 365 on Windows.
How to password protect an Excel file in Microsoft 365 and SharePoint
Excel files stored in Microsoft 365 cloud services such as OneDrive or SharePoint cannot have traditional password protection applied directly through Excel Online. Instead, protection relies on SharePoint permissions, versioning, and Information Rights Management (IRM) to control access and editing.
To restrict access and editing through SharePoint permissions:
- Navigate to the SharePoint document library where the Excel file is stored. Confirm the file appears in the list.
- Select the file, click the ellipsis ("...") or right-click, and choose "Manage access." A panel showing current permissions opens.
- Adjust permissions by granting "View Only" or "Read" rights to users who should not edit the file, and "Edit" rights only to authorized users. Changes save automatically.
- Enable versioning in the library settings to track changes and allow rollback if unauthorized edits occur. This setting is found under "Library Settings" > "Versioning Settings." Confirm versioning is enabled.
Tip: Use Information Rights Management (IRM) to impose additional restrictions such as preventing printing or copying content, which can be enabled from the SharePoint library settings.
Excel Online itself does not support setting passwords to open or modify files. Therefore, desktop password protection remains stronger for encrypting files. SharePoint permissions provide granular control over who can open or edit files but do not encrypt the content.
How to password protect an Excel file online
Excel Online does not support native password protection for opening or editing files. Users cannot set or remove passwords directly within the online interface, which limits the ability to secure files solely through Excel Online.
Third-party online services offer password protection by encrypting Excel files or converting them into password-protected formats. These services typically require uploading the file to their server, where encryption is applied before downloading the secured file.
Security risks and trust considerations: Using online password protection tools involves uploading sensitive data to external servers, which can pose privacy and security risks. User feedback commonly highlights concerns about data confidentiality and reliability, especially with lesser-known services.
Best practices for sharing sensitive Excel files online: Rather than relying on third-party password tools, it is safer to password protect files locally with desktop Excel before uploading. Alternatively, use secure sharing platforms with built-in permission controls, such as Microsoft 365 or SharePoint, to manage access without exposing passwords.
- Open the Excel file in a trusted desktop app and apply password protection.
- Upload the protected file to an online platform for sharing.
- Set sharing permissions carefully to restrict access only to authorized users.
Tip: Avoid online password protectors that do not clearly state their encryption standards and data handling policies.
Troubleshooting common issues with Excel password protection
Forgetting or losing an Excel password typically results in permanent loss of access, as Microsoft does not provide native password recovery tools due to security reasons. Third-party recovery software exists but varies greatly in success rates and may pose security risks. Users should carefully evaluate such tools and back up files before attempting recovery.
Compatibility issues arise when opening password protected files across different Excel versions or platforms. Older versions or mobile apps may not support certain encryption methods, causing inability to open or edit files. Ensuring software updates or using desktop Excel versions helps mitigate these issues.
Opening password protected files on mobile devices often requires entering the password each time, and some features may be limited. Using Microsoft 365 apps with synchronized credentials improves the experience but does not eliminate all restrictions.
Corrupted files due to improper password entry or interruptions during the encryption process can prevent access. Repair tools integrated into Excel (File > Info > Check for Issues > Inspect Document or Repair) can sometimes restore files, but recovery is not guaranteed.
Steps to attempt file repair in Excel:
- Open Excel and go to File > Open.
- Select the corrupted file but instead of opening normally, click the dropdown arrow next to Open and choose Open and Repair.
- Choose Repair to attempt automatic recovery; expect a message indicating success or failure.
- If Repair fails, select Extract Data to salvage cell contents.
Tip: Maintaining regular backups and using consistent password management practices reduce risks associated with password loss or corruption.
Further reading
- How to Password Protect a PDF: Step-by-Step Guide for All Users
- How to Encrypt a USB Drive: Step-by-Step Guide for Mac and Windows
- How to Encrypt an External Hard Drive: Step-by-Step Guide
Frequently asked questions
How to password protect an Excel file from opening?
To password protect an Excel file from opening, open the file and go to File > Info > Protect Workbook > Encrypt with Password. Enter a strong password and confirm it. This password will be required every time someone tries to open the file, preventing unauthorized access. Keep in mind that losing the password means the file cannot be opened.
How to password protect an Excel file in SharePoint?
In SharePoint, Excel files inherit permissions set through the SharePoint document library or folder. To restrict access, configure permissions via Settings > Library Settings > Permissions for this document library, setting who can view or edit files. For additional protection, password-protect the Excel file itself before uploading, as SharePoint permissions control access but do not encrypt the file.
How to password protect an Excel file but allow read only?
To allow read-only access while restricting editing, go to File > Info > Protect Workbook > Restrict Access > Restricted Access if using IRM, or use File > Save As > Tools > General Options and set a password to modify only. Users can open and view the file without a password but must enter one to make changes. This method balances accessibility with protection against unauthorized edits.
How to password protect an Excel file in Microsoft 365?
In Microsoft 365 Excel, password protection is accessed via File > Info > Protect Workbook > Encrypt with Password. For collaborative files saved on OneDrive or SharePoint, use the Share feature to manage permissions and add password protection to downloaded copies if needed. Microsoft 365 also supports sensitivity labels for additional data protection management.
Limits of Excel Password Protection
Password protection in Excel is not foolproof encryption; highly skilled attackers or specialized software can potentially bypass it. Users handling extremely sensitive or regulated data should consider dedicated encryption tools or enterprise-grade security solutions.
Lost passwords cannot be recovered by Microsoft. Maintaining secure backups and accurate password records is essential to avoid permanent data loss.
Excel Online does not support setting passwords to open or modify files directly within the browser. Password protection must be applied using the desktop version or through SharePoint and Microsoft 365 permissions.
The most useful next step is to regularly test password-protected files by reopening them on all intended platforms to ensure access and restrictions behave as expected, minimizing surprises when sharing or collaborating.