How to Delete Siri History Across All Apple Devices
This guide explains how to delete Siri history on iPhone, iPad, Apple Watch, and Mac to manage your voice assistant data privacy.

This article explains how to delete Siri history across all Apple devices, providing clear, step-by-step instructions for iPhone, iPad, Apple Watch, and Mac. Managing Siri history involves understanding where voice data is stored and how deletion affects each device.
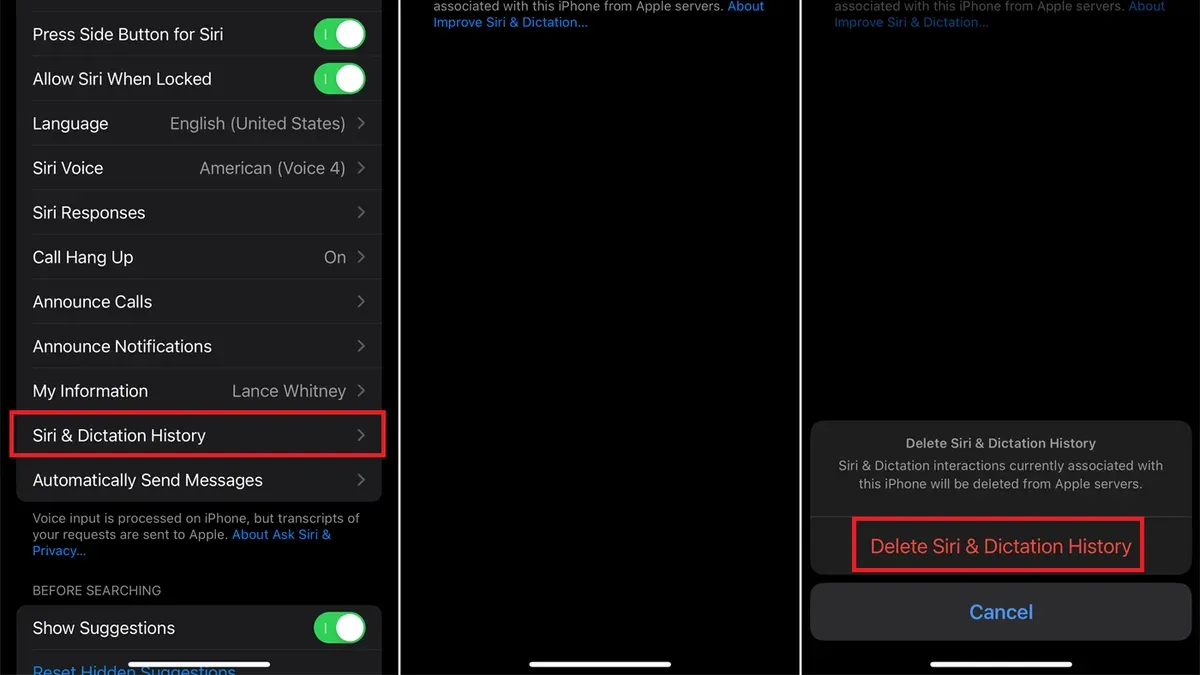
Users seeking to control their voice assistant data privacy will find detailed guidance on the exact settings and menu paths to remove Siri and dictation interactions. This includes navigating to Settings > Siri & Search > Siri & Dictation History on iOS and iPadOS devices, or System Settings > Siri & Spotlight > Siri & Dictation History on Mac.
Knowing how to delete Siri history helps clarify what data Apple retains and what removal means for user privacy across devices. This article also covers the implications of deletion and how to deactivate Siri if preferred.
Before you start: What is needed to manage Siri history
Managing Siri history requires an Apple device with Siri enabled, such as an iPhone, iPad, Apple Watch, or Mac. Access to the device’s Settings app is essential to locate options related to Siri and Dictation data. Additionally, users must have their Apple ID credentials available, as Siri and Dictation history is associated with the Apple ID and stored on Apple servers, not just locally on the device.
According to Apple's official privacy information, Siri and Dictation audio recordings and transcripts are linked to the Apple ID and may be retained on Apple servers to improve Siri and Dictation services. Deleting Siri history removes the data stored on these servers across devices signed in with the same Apple ID. However, it does not disable Siri or prevent further data collection unless Siri is turned off.
Understanding these prerequisites and implications helps users make informed decisions when managing their Siri history. Deleting history affects privacy by removing previous interactions but does not erase all data related to Siri usage, such as device-based processing or anonymized data used for service improvements.
- Confirm that Siri is enabled on the Apple device by opening Settings > Siri & Search. A toggle should be on for options like "Listen for 'Hey Siri'" or "Press Side Button for Siri." Successful verification shows these toggles turned on.
- Ensure the device is signed in with the correct Apple ID by opening Settings and tapping the user's name at the top. The Apple ID email will be displayed. This confirms which account’s Siri history will be affected.
- Have the Apple ID password ready if prompted during the deletion process, as some actions may require authentication. Being prepared avoids interruptions.
- Familiarize oneself with the difference between deleting Siri history and disabling Siri to set expectations about privacy outcomes. Deletion clears past data stored on Apple servers, while disabling stops new data from being collected.
Tip: Before starting, it can be helpful to back up important device settings or data, as some Siri and Dictation preferences might reset during the management process.
How to delete Siri history on iPhone
- Open the Settings app on the iPhone. The Settings icon resembles gray gears.
- Scroll down and tap Privacy & Security. This section controls data and privacy preferences.
- Within Privacy & Security, select Siri & Dictation. This menu manages Siri-related data and permissions.
- Tap Delete Siri & Dictation History. A confirmation prompt will appear explaining that this deletes data associated with the Apple ID stored on Apple's servers.
- Confirm the deletion by tapping Delete. This action removes voice input data used to improve Siri and dictation services.
- To disable Siri temporarily, return to the main Settings menu, select Siri & Search, then toggle off Listen for "Hey Siri" and Press Side Button for Siri. This prevents new Siri data from being recorded.
- For permanent deactivation, within Siri & Search, toggle off all options including Allow Siri When Locked. This completely disables Siri on the iPhone.
Tip: Deleting Siri history removes data from Apple’s servers but does not affect local Siri settings or preferences on the device.
How to delete Siri history on iPad
The process to delete Siri history on iPad closely mirrors that on iPhone, though the iPadOS interface presents some settings slightly differently due to its larger screen and multitasking features.
- Open the Settings app on the iPad. The settings layout is similar to iPhone, with sections ordered alphabetically.
- Scroll down and tap Privacy & Security. This section houses controls related to data and permissions.
- Within Privacy & Security, select Siri & Dictation. Here, options for managing Siri’s data and functionality are found.
- Tap Delete Siri & Dictation History. A confirmation prompt appears to ensure the user intends to remove all voice input data stored on Apple servers associated with the Apple ID.
- Confirm deletion. The system then removes the stored history. Note this does not affect local voice commands or settings.
- To deactivate Siri entirely, return to the main Settings menu, select Siri & Search, and toggle off Listen for "Hey Siri" and Press Home (or Top) Button for Siri. This disables Siri input on the device.
Tip: Deleting Siri history on iPad removes data from Apple servers but does not erase local voice command settings or disable Siri unless explicitly turned off.
How to delete Siri history on Apple Watch
Siri history on Apple Watch is primarily managed through the paired iPhone because the Apple Watch itself does not store extensive Siri interactions locally. Voice requests and dictation data are processed and stored on Apple servers linked to the user’s Apple ID via the iPhone.
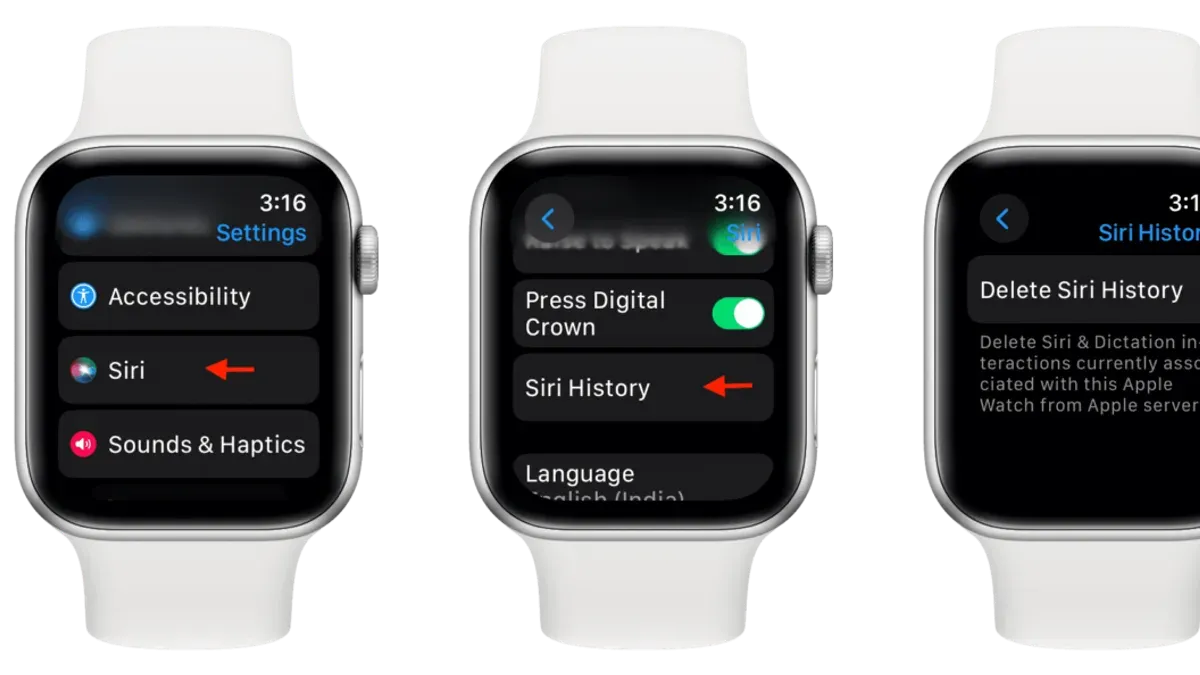
To delete Siri history affecting the Apple Watch, use the iPhone’s Privacy & Security settings. This action removes Siri and dictation data from Apple servers across all devices linked to the same Apple ID, including the Apple Watch.
Steps to delete Siri history related to Apple Watch:
- Open the Settings app on the paired iPhone.
- Scroll to and tap Privacy & Security.
- Tap Apple Analytics & Improvements.
- Select Improve Siri & Dictation.
- Tap Delete Siri & Dictation History to remove data stored on Apple servers.
- Confirm the deletion when prompted.
After completing these steps, Siri history will be cleared from Apple servers for all devices using the Apple ID, including the Apple Watch.
To deactivate or restrict Siri on the Apple Watch:
- Open the Watch app on the paired iPhone.
- Tap My Watch tab at the bottom.
- Scroll down and tap Siri.
- Toggle off options such as Listen for “Hey Siri”, Raise to Speak, or Press Digital Crown to restrict Siri usage on the watch.
Tip: Deleting Siri history only removes data stored on Apple servers; some usage data may remain temporarily on devices until overwritten.
How to delete Siri history on Mac
Mac users can manage Siri history and privacy through System Settings or System Preferences, depending on the macOS version. The process involves locating Siri & Spotlight settings to remove stored voice data and optionally disabling Siri to prevent further data collection.
- Open System Settings (macOS Ventura and later) or System Preferences (earlier versions) from the Apple menu. A window with multiple icons or categories will appear.
- Locate and select Siri & Spotlight. This section manages Siri features and voice input settings.
- Scroll down to find the option labeled Delete Siri & Dictation History. Click this button to remove your stored voice interactions from Apple servers. A confirmation prompt will appear; confirm to proceed.
- To disable Siri entirely, toggle off the Ask Siri option at the top of the Siri & Spotlight settings page. This prevents Siri from listening or processing requests on the Mac.
- For additional privacy control, users can also review and adjust iCloud settings where Siri data may be synced across devices. Open System Settings > Apple ID > iCloud and verify if Siri data synchronization is enabled.
Tip: Deleting Siri history does not remove all data stored locally on the Mac, but it clears the voice data Apple uses to improve Siri’s accuracy linked to the Apple ID.
What is delete Siri & dictation history and what it means for privacy
Deleting Siri & dictation history removes voice inputs and related data associated with the user’s Apple ID from Apple’s servers. This action helps reduce the amount of personal data Apple retains for processing requests and improving Siri’s performance.
However, local device data such as cached Siri interactions or voice input logs may persist unless Siri is disabled entirely on the device. Apple anonymizes much of the data it keeps, separating it from user identities to improve services without compromising privacy.
According to Apple’s privacy policy, some data is retained in a dissociated form to enhance Siri and dictation features. Independent privacy analyses confirm that while deleting history limits Apple’s access to personalized voice data, it does not fully erase all voice-related traces immediately, due to system caching and backups.
Users should understand that deleting Siri & dictation history is an important privacy step but not a comprehensive removal of all voice data from devices or Apple’s infrastructure.
Tip: Disabling Siri on a device can help ensure local voice data is also cleared, complementing history deletion from Apple servers.
How to deactivate Siri on various devices
Disabling Siri stops voice commands and prevents future voice data collection linked to the device. The process varies slightly across Apple devices but generally involves turning off Siri in settings and confirming the action.
iPhone and iPad
- Open the Settings app and tap Siri & Search.
- Toggle off Listen for "Hey Siri". A prompt will appear; confirm by tapping Turn Off Siri.
- Toggle off Press Side Button for Siri (or Press Home for Siri on older models).
- Confirm the deactivation if prompted. The device will no longer respond to voice activation or button presses for Siri.
Apple Watch
- On the paired iPhone, open the Watch app.
- Tap Siri.
- Turn off Listen for "Hey Siri", Raise to Speak, and Press Digital Crown to disable all Siri functions on the watch.
- Siri will stop responding on the Apple Watch, though other functions remain active.
Mac
- Open System Settings (or System Preferences on earlier macOS versions).
- Select Siri & Spotlight (or just Siri in older versions).
- Toggle off Ask Siri.
- Confirm if prompted. The Mac will no longer activate Siri via voice or keyboard shortcuts.
Consequences: Deactivating Siri disables all voice assistant features, including hands-free commands, dictation enhancements, and shortcuts relying on Siri. Users lose convenience but gain tighter control over voice data collection.
Alternatives: Instead of full deactivation, limiting Siri’s access to specific apps or data can reduce privacy risks while retaining some voice control. This is done via Settings > Siri & Search on iPhone and iPad, or System Settings > Siri & Spotlight on Mac, where permissions can be customized.
Tip: After deactivating Siri, review Microphone permissions in Privacy & Security settings to restrict app access and further protect voice data.
Troubleshooting common issues when deleting Siri history
Some users report the Siri history deletion option may be missing or grayed out. This often occurs if the device is running an outdated iOS, iPadOS, or macOS version. Updating to the latest software typically restores access to these privacy controls.
There can be a delay between requesting deletion and seeing the effect on Apple servers. Apple notes it may take several days for the removal to complete fully. During this time, Siri suggestions or responses may still reflect previous interactions.
Issues also arise when multiple Apple IDs are in use or devices are not properly synced. Voice data linked to a different Apple ID will not be affected by deletion requests on another account. Ensuring all devices use one Apple ID and have current sync status helps maintain consistent Siri history management.
Deleting Siri history does not immediately remove all influence on Siri suggestions or responses. Local device learning and cached data can persist temporarily. Restarting the device and allowing time for system updates can reduce residual suggestions.
Steps to resolve common Siri history deletion problems
- Check for and install any available software updates (Settings > General > Software Update). After updating, revisit Siri history settings to confirm deletion options are enabled.
- Verify that the device is signed in with the correct Apple ID under Settings > [User Name]. If multiple Apple IDs are used, sign out of others and sign in with the primary account.
- Restart the device to clear temporary caches that may affect Siri suggestions or history display.
- Allow up to several days for Apple servers to process deletion requests fully. Monitor Siri behavior during this period for changes.
- If problems persist, contact Apple Support or consult the Apple Community forums for device-specific advice and updates on known issues.
Further reading
- How to Delete Google Assistant Recordings and Manage Privacy Settings
- How to Delete Alexa Recordings: A Complete Step-by-Step Guide
- How to Turn On and Off Advanced Data Protection for iCloud
Frequently asked questions
How to delete siri search history?
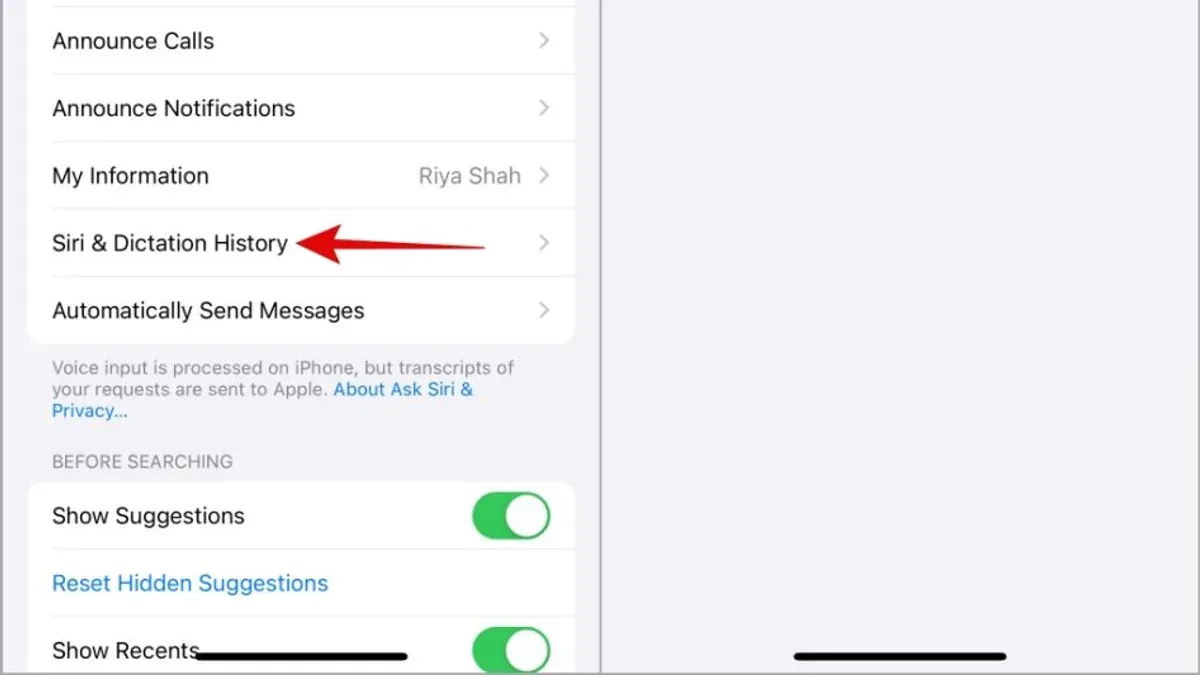
To delete Siri search history, open Settings on an iPhone or iPad, go to Privacy & Security > Siri & Search, then tap Siri & Dictation History. Select Delete Siri & Dictation History to remove the data stored on Apple servers. This process deletes voice interactions and dictation data associated with the device.
How to clear siri search history?
Clearing Siri search history involves deleting both the on-device and Apple server-stored voice data. This can be done in Settings under Privacy & Security by selecting Siri & Search, then tapping on Siri & Dictation History and choosing the option to delete the history. Note that this removes past interactions but does not prevent new data collection unless Siri is disabled.
How to find siri search history?
Siri search history is not viewable as a consolidated list on Apple devices. While some recent Siri interactions may appear in search suggestions or app-specific history, Apple does not provide a direct interface to browse all saved Siri voice data. Users can manage or delete this history only through device privacy settings.
How to find Siri search history on iPhone?
On an iPhone, Siri search history cannot be accessed as a single list. Instead, some recent requests may show up in the Spotlight search or app suggestions. To manage or remove Siri data, navigate to Settings > Privacy & Security > Siri & Search and use the Siri & Dictation History option to delete stored recordings.
How to delete Siri history on Apple Watch?
Deleting Siri history on an Apple Watch requires using the paired iPhone. Open the Watch app on the iPhone, go to Privacy & Security settings, and then follow the same steps as on the iPhone to delete Siri & Dictation History. The watch itself does not have a dedicated interface for managing Siri history.
Limits of deleting Siri and dictation history
Deleting Siri and dictation history removes voice interactions stored on Apple servers associated with the Apple ID, but it does not erase all voice data immediately or data locally stored on devices. Some information may persist for service improvement, diagnostics, or backup purposes. This process does not affect transcripts or audio files saved outside Apple’s ecosystem or shared with third-party apps. Users seeking full data removal, including local device storage or backups, might need to perform additional steps such as resetting devices or contacting Apple Support.
For those highly concerned about privacy, disabling Siri entirely and reviewing app permissions can provide stronger control over voice data. Enterprise users or organizations with specific compliance requirements may require customized device management solutions beyond typical user settings.
The single most useful next step is to regularly review and manage Siri & Search settings on each Apple device, ensuring that voice data handling aligns with personal privacy preferences and device usage patterns.