How to Secure a WooCommerce Website: A Step-by-Step Guide
This guide provides clear, actionable steps to secure a WooCommerce website, protecting customer data and enhancing overall site security.

This guide explains how to secure a WooCommerce website through a series of clear, actionable steps tailored to e-commerce environments.
WooCommerce stores face unique security challenges, including protecting customer payment data, managing user roles with varying access levels, and defending against targeted attacks on online shops. Understanding these specific risks is essential for effective protection.
Securing a WooCommerce website involves not only keeping WordPress and WooCommerce updated but also implementing strong authentication, configuring SSL/TLS encryption, and using security plugins designed for e-commerce. This approach balances robust security with site performance and customer trust.
Before you start: prerequisites and preparation
Securing a WooCommerce website requires specific access, tools, and foundational knowledge to ensure effective implementation and avoid disruptions. Before applying security measures, confirm that administrative access to both the WooCommerce and WordPress dashboards is available. This level of access allows for configuration changes, plugin management, and monitoring of site activities.
Access to the hosting control panel or FTP is equally critical. Common hosting control panels include cPanel, Plesk, and DirectAdmin, each offering file management, database access, and server-level configurations. For example, cPanel provides a File Manager and phpMyAdmin, while Plesk integrates file access with security settings in one interface. FTP access through clients like FileZilla allows direct manipulation of site files, useful when dashboard access is compromised.
Backing up the WooCommerce store and its database before making changes is essential. Backup solutions vary from hosting-integrated tools to WordPress plugins. Popular plugins include UpdraftPlus, which supports scheduled backups to remote storage such as Google Drive or Dropbox, and BackupBuddy, known for comprehensive backup options. Choosing a method depends on the hosting environment and ease of restoration.
Basic knowledge of WordPress plugins and the site’s structure is necessary to identify which components affect security. Understanding where themes, plugins, and uploads reside in the file system helps when troubleshooting or manually securing files. Recognizing plugin interfaces and their settings is important to configure security-focused tools properly.
Lastly, understanding SSL certificates and their role in encrypting data between the customer and the server is a prerequisite. SSL certificates can be obtained through providers like Let’s Encrypt, which offers free certificates, or commercial vendors providing extended validation. Ensuring the certificate is active and properly installed prevents warnings that could deter customers.
- Log into the WordPress dashboard using an administrator account. Successful login shows the WordPress admin menu on the left side.
- Access the hosting control panel (e.g., cPanel) via the hosting provider’s website. Confirm file manager and database access are visible.
- Verify FTP access by connecting with an FTP client using provided credentials. A successful connection displays the site's root directories.
- Locate and confirm an existing backup solution in place, either via hosting backups or installed plugins like UpdraftPlus. Confirm recent backup files are stored locally or remotely.
- Review the list of active plugins to confirm familiarity with their functions, especially those related to security and WooCommerce operations.
- Check that an SSL certificate is installed and active by viewing the site URL as HTTPS and looking for a padlock icon in the browser address bar.
Tip: Document all access credentials and backup locations securely before making any changes to avoid lockouts or data loss.
Keep WooCommerce and WordPress core updated
Keeping WooCommerce, WordPress core, and associated plugins up to date is the foundational step in securing an online store. Outdated software often contains known vulnerabilities that attackers exploit to gain unauthorized access or cause disruptions. For example, many WooCommerce updates address security flaws such as cross-site scripting (XSS) and SQL injection vulnerabilities.
Regular updates reduce the risk posed by these issues and ensure compatibility with security standards and new features. WooCommerce’s development team frequently releases patches that fix vulnerabilities discovered in prior versions, making timely updates essential.
To update WooCommerce, WordPress, and plugins safely, follow these steps:
- Log in to the WordPress admin dashboard. Once logged in, the dashboard homepage will be visible.
- Navigate to Dashboard > Updates. This page lists all available updates for WordPress core, themes, and plugins, including WooCommerce.
- Back up the entire site and database before proceeding. Successful backup completion is confirmed by a notification or backup plugin interface.
- Click the Update Now button under WordPress core updates if available. The page will refresh, indicating the update is in progress and then confirm completion.
- Scroll down to the Plugins section and select WooCommerce along with any other plugins showing updates. Click Update Plugins. After completion, a success message will appear.
- Visit the WooCommerce status page under WooCommerce > Status to verify the current version and check for any errors or warnings.
Scheduling regular update checks is advisable. Many site administrators set monthly or biweekly reminders, depending on store activity. Enabling automatic updates for WooCommerce and security plugins can also help maintain security but should be balanced against potential compatibility issues.
Tip: Use a staging environment to test updates before applying them to the live store, reducing the risk of downtime or conflicts.
Use strong authentication and limit login attempts
Protecting the WooCommerce login process is critical to prevent brute force attacks that can compromise site security. One foundational step is enforcing strong admin passwords by requiring a minimum of 12 characters combining uppercase, lowercase, numbers, and symbols. Avoid common usernames like "admin" or "administrator" as these are often targeted first in attacks. Changing the default admin username to a unique one reduces the risk of automated login attempts.
Implementing two-factor authentication (2FA) adds a crucial layer of defense. Plugins such as "Two Factor Authentication" or "Wordfence Login Security" enable 2FA methods including time-based one-time passwords (TOTP) or email verification. This means even if a password is compromised, unauthorized access is prevented without the second authentication factor.
Limiting login attempts helps block repeated password guessing. Plugins like "Limit Login Attempts Reloaded" or security suites like "Wordfence" allow configuration of the maximum number of failed logins before temporarily locking out the IP address. A common setting is to allow 3 to 5 failed attempts within 5 minutes, followed by a 15-minute lockout. This disrupts automated brute force attempts without affecting legitimate users significantly.
Steps to set up login attempt limits in the "Limit Login Attempts Reloaded" plugin:
- Install and activate the "Limit Login Attempts Reloaded" plugin.
Expected result: The plugin appears in the WordPress admin menu under Settings. - Navigate to Settings > Limit Login Attempts.
Expected result: The configuration panel opens showing options for lockout thresholds and durations. - Set "Allowed retries" to 4 and "Lockout duration" to 15 minutes.
Expected result: The plugin will block IPs after 4 failed login attempts for 15 minutes. - Save the settings.
Expected result: A confirmation message appears indicating settings were saved. - Test by intentionally entering wrong passwords 5 times.
Expected result: On the 5th attempt, the login page displays a lockout message preventing further attempts temporarily.
Login attempt logs before enabling limits typically show numerous failed attempts from the same IP, often hundreds in a short period. After enabling limits, logs demonstrate significantly fewer failed attempts per IP and many blocked requests, indicating the lockout is effective.
Tip: Combine strong passwords, 2FA, and login attempt limits to create a layered defense that greatly reduces risk of unauthorized access to the WooCommerce admin area.
Secure SSL/TLS encryption for customer data
SSL/TLS encryption is essential for WooCommerce stores to protect sensitive customer information and establish trust. HTTPS not only encrypts data exchanged between a customer’s browser and the server, but it also positively influences search engine rankings and consumer confidence. Stores using HTTPS typically see higher conversion rates than those limited to HTTP, as customers feel more secure entering payment and personal details.
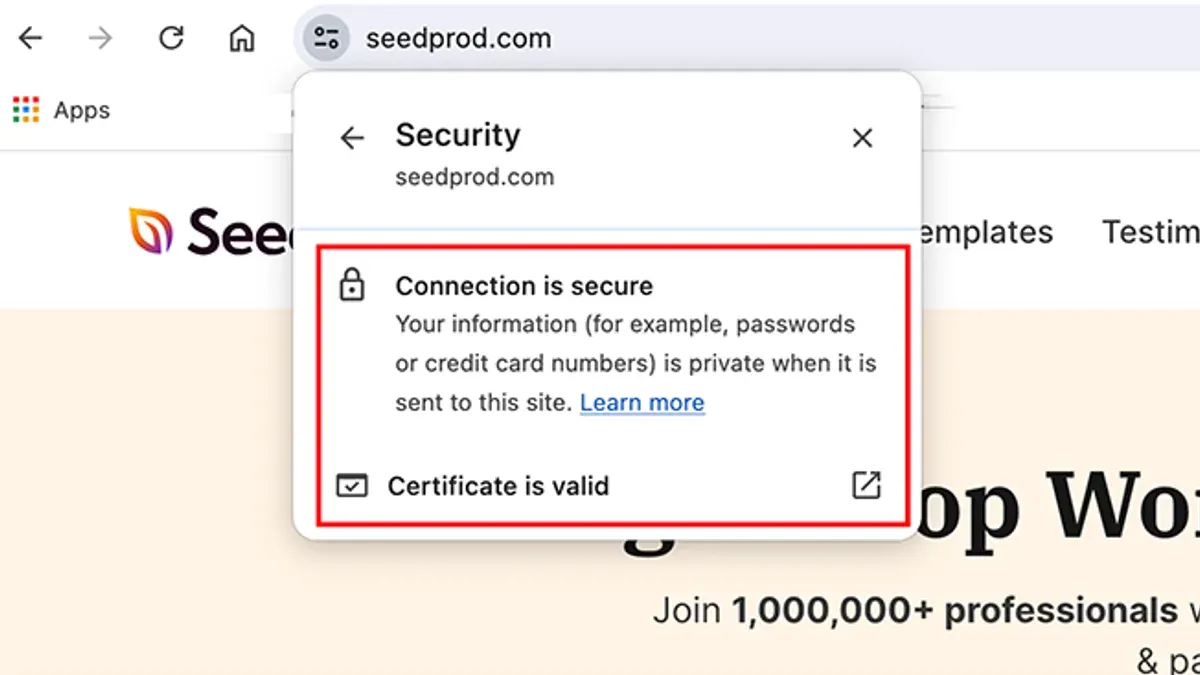
Setting up SSL correctly requires obtaining a valid SSL certificate from a trusted Certificate Authority (CA) or via free providers such as Let's Encrypt. Many hosting providers offer streamlined SSL installation through their control panels.
- Obtain an SSL certificate: Choose an SSL certificate type based on store needs, such as Domain Validation (DV) for basic encryption or Extended Validation (EV) to show additional trust indicators. Once purchased or requested, the certificate files will be provided by the CA.
- Install the SSL certificate: Access the hosting control panel (e.g., cPanel, Plesk) and navigate to the SSL/TLS settings. Upload the certificate files or activate the free SSL option if available. Successful installation typically shows a confirmation message indicating the certificate is active.
- Configure WooCommerce to use HTTPS: In the WordPress dashboard, go to Settings > General and update both the “WordPress Address (URL)” and “Site Address (URL)” fields to use https:// instead of http://. Save changes and verify the site loads over HTTPS.
- Force HTTPS on all store pages: Implement a redirect from HTTP to HTTPS to ensure consistent encryption. This can be done via.htaccess rules or by using a security plugin like Wordfence or Really Simple SSL. After configuration, visiting any HTTP URL should automatically redirect to its HTTPS counterpart.
- Verify HTTPS on checkout and login pages: Confirm that all sensitive pages, especially the checkout, cart, and login pages, display HTTPS with a secure padlock icon in the browser address bar. Any mixed content warnings indicating non-secure elements should be resolved by updating URLs to HTTPS.
Common SSL misconfigurations to avoid include expired certificates, incomplete certificate chains, and mixed content issues caused by loading images or scripts over HTTP. Such errors can undermine trust and trigger browser security warnings, negatively impacting user experience and conversions.
Tip: Use online tools like SSL Labs’ SSL Test to check certificate validity and server configuration for potential vulnerabilities or weaknesses.
Configure firewall and security plugins tailored to WooCommerce
Securing a WooCommerce store requires selecting the right combination of firewalls and security plugins that effectively address e-commerce specific risks without compromising site performance. Understanding the distinction between web application firewalls (WAFs) and server firewalls is essential for making informed decisions.
Server firewalls operate at the network level, filtering traffic based on IP addresses, ports, and protocols. They provide broad protection against unauthorized access but offer limited insight into application-layer threats specific to WooCommerce transactions. Web application firewalls, on the other hand, inspect HTTP/HTTPS requests to detect and block attacks targeting vulnerabilities in WooCommerce and WordPress plugins, such as SQL injection or cross-site scripting.
Popular WooCommerce-compatible security plugins that include WAF features are Wordfence Security, Sucuri Security, and iThemes Security. These plugins integrate application-level firewalls with additional features like malware scanning, brute force protection, and real-time threat intelligence.
Recommended plugin settings to protect payment pages and customer information include:
- Enabling firewall rules that specifically protect WooCommerce endpoints such as /checkout/, /my-account/, and /cart/.
- Activating rules to block suspicious POST requests and limit access to XML-RPC and REST API to prevent abuse.
- Configuring the plugin to scan for unauthorized file changes within WooCommerce directories.
- Setting up real-time alerts for detected threats related to customer data or payment processing.
When configuring security plugins, it is critical to avoid conflicts arising from overlapping features. Running multiple firewalls or security plugins simultaneously can cause false positives, slow site performance, and complicate troubleshooting. For example, using both Wordfence and Sucuri active simultaneously is generally discouraged. Instead, choose one comprehensive solution or clearly segregate their roles, such as using a server-level firewall separately from a plugin-based WAF.
Performance benchmarks from independent reviews suggest that lightweight plugins like Wordfence offer a good balance of protection and speed on moderate-traffic WooCommerce sites, while cloud-based services like Sucuri may introduce slight latency but provide robust external firewall protection that can mitigate DDoS attacks. Assessing site traffic and hosting capacity helps determine the best fit.
- Install a WooCommerce-compatible security plugin from the WordPress repository or a trusted vendor.
- Activate the firewall feature and navigate to its settings panel, typically found under Security > Firewall or similar.
- Enable protection rules for WooCommerce-specific pages such as checkout and account areas.
- Configure additional options to restrict XML-RPC and REST API access unless explicitly needed.
- Set up monitoring for file integrity to detect unauthorized changes.
- Enable email or dashboard notifications for security alerts concerning payment or customer data.
- Test the site’s checkout process to confirm no functionality is blocked by the firewall.
- Regularly review plugin logs and update firewall rules based on emerging threats.
Tip: When performance issues arise, consider offloading firewall protection to a cloud-based service to reduce the plugin load on the WooCommerce server.
Regularly back up the WooCommerce site and database
Backing up a WooCommerce site and its database is a critical defense against data loss, ransomware attacks, and other security incidents. For active stores with frequent orders and updates, daily backups are recommended to ensure minimal data loss and swift recovery.
Choosing between manual and automated backups depends on the store’s scale and available resources. Manual backups require initiating the process via hosting control panels or plugins, which risks human error or forgetfulness. Automated backups configured through reputable plugins or hosting services reduce this risk by scheduling regular snapshots without manual intervention.
Storing backups securely off-site is essential to prevent backups from being compromised along with the live site. Options include cloud storage solutions like Amazon S3, Google Drive, or specialized backup services. Keeping multiple backup copies in different locations further protects against local hardware failures.
Testing backups by performing periodic restoration drills verifies the integrity and usability of backup files. Without testing, corrupted or incomplete backups may go unnoticed until a crisis occurs, delaying recovery.
Steps to create and verify regular WooCommerce backups
- Install a backup plugin such as UpdraftPlus or BackupBuddy and navigate to the plugin’s settings page; a backup configuration interface should appear.
- Set backup frequency to daily for both the database and files; confirm the schedule is active and visible in the plugin dashboard.
- Configure the remote storage option, for example, link the plugin to a Google Drive account; a successful connection confirmation should be displayed.
- Perform an initial manual backup by clicking the “Backup Now” button; upon completion, the backup file should be listed with a timestamp.
- Download the backup file to a local machine or secondary storage; verify the file size is reasonable and not zero bytes.
- Test restoration by applying the backup to a staging or test environment; the restored site should load with all data intact, confirming backup validity.
A case study highlights the value of backups: a mid-sized WooCommerce store targeted by a ransomware attack was able to restore operations within hours by reverting to a recent backup stored off-site. Without this, recovery could have taken days or weeks, causing significant revenue loss and customer dissatisfaction.
Tip: Regularly review backup logs and storage quotas to ensure backups run smoothly and storage limits do not cause failures.
Manage user roles and permissions carefully
WooCommerce and WordPress assign default user roles to control access levels on the site, each with predefined capabilities. Common roles include Administrator, Shop Manager, Customer, and Subscriber. Administrators have full control over the site, while Shop Managers can manage WooCommerce settings, products, and orders without broader site access. Customers and Subscribers have limited capabilities mainly related to their own accounts.
Applying the principle of least privilege means granting users only the permissions necessary for their tasks. This reduces the risk of accidental or malicious changes that could compromise site security or customer data. For example, a customer service representative might only need Shop Manager capabilities for order management but not access to site settings or plugin installations.
Regularly auditing user accounts helps identify outdated or unnecessary roles. Removing inactive users or downgrading roles limits potential attack vectors. Audits can be performed monthly or quarterly depending on site size and staff turnover.
When default roles do not meet specific operational or security needs, plugins such as User Role Editor or Members allow customization of capabilities. These tools enable fine-tuning of permissions, such as allowing editing products but disabling access to payment settings, balancing functionality with security.
Below is an example WooCommerce role permission matrix for store staff illustrating typical capabilities:
| Role | Access to WooCommerce Settings | Manage Products | Process Orders | Manage Plugins/Themes | User Management |
|---|---|---|---|---|---|
| Administrator | Full | Full | Full | Full | Full |
| Shop Manager | Full | Full | Full | None | None |
| Customer Service | None | View Only | Full | None | None |
| Customer | None | None | None | None | Manage Own Account |
To manage user roles and permissions effectively, follow these steps:
- Navigate to the WordPress dashboard and select Users > All Users. The list of current users and their roles should appear.
- Review each user’s role and confirm it matches their job function. Users with roles beyond their needs should be edited.
- Click on a user’s name to edit their profile. In the Role dropdown menu, assign the most limited role that covers necessary tasks. Save changes.
- For custom permission needs, install and activate a plugin like User Role Editor. Access it via Users > User Role Editor.
- Within the plugin, select the role to modify and check or uncheck capabilities accordingly. Save the role configuration and test by logging in as a user with that role to verify proper access.
- Regularly schedule audits of user roles and permissions, removing or adjusting accounts as needed to maintain minimal privilege exposure.
Tip: Restrict Administrator roles to as few trusted individuals as possible to reduce risk of critical system changes or breaches.
Secure payment gateways and sensitive customer information
Choosing a reputable payment gateway is the first critical step to securing the WooCommerce checkout process. Payment gateways such as Stripe, PayPal, and Authorize.Net are widely trusted for their robust security protocols and PCI compliance. These platforms handle payment processing externally, reducing the risk exposure on WooCommerce stores and minimizing the need to store sensitive payment data locally.
Avoid storing sensitive payment information directly on the WooCommerce site. Storing credit card numbers, CVV codes, or full payment details increases liability and the risk of data breaches. Instead, configure WooCommerce to use tokenization methods offered by payment gateways, which store only tokens representing payment data rather than the data itself.
Understanding the basics of PCI DSS (Payment Card Industry Data Security Standard) compliance is essential for WooCommerce store owners. PCI compliance requires secure handling, transmission, and storage of payment data. Using payment gateways that are PCI-compliant offloads much of this responsibility, allowing the store to meet compliance more easily. WooCommerce itself supports PCI compliance when configured properly alongside compliant gateways.
Encrypting stored customer data beyond payment details is also vital. Sensitive personal information such as billing addresses, phone numbers, and order history should be protected with encryption at rest. This can be achieved through database-level encryption or using security plugins that support data encryption features. Encrypting data reduces the impact of potential breaches and enhances customer trust.
Evidence suggests that WooCommerce stores using secure, PCI-compliant payment gateways experience fewer chargebacks compared to those managing payment data insecurely. Chargebacks negatively affect store reputation and financial stability, emphasizing the value of secure payment configurations.
- Access the WooCommerce admin dashboard and navigate to WooCommerce > Settings > Payments. The payment methods available should be clearly listed.
- Activate a reputable, PCI-compliant payment gateway such as Stripe or PayPal by selecting it and clicking Set up. When configured correctly, the gateway status will change to Enabled and show connection confirmation.
- Verify payment gateway settings include tokenization or off-site processing options to avoid storing sensitive payment details. The gateway documentation often highlights these features.
- Ensure WooCommerce is not configured to store full credit card information by checking WooCommerce > Settings > Payments > (Gateway Name) > Advanced Settings. No option should be enabled to store complete card data locally.
- Implement encryption for sensitive customer information by installing and activating a security plugin that supports database encryption, such as Wordfence or WP Encryption. Confirm encryption is active in the plugin’s configuration panel.
- Test the checkout process by making a small test transaction. Successful payment authorization without storing sensitive card data locally indicates correct setup.
Tip: Regularly review payment gateway logs and WooCommerce order metadata to detect any unexpected storage of sensitive payment data, which could indicate misconfiguration.
Monitor and scan WooCommerce for vulnerabilities regularly
Continuous monitoring and scanning are essential to maintain the security of a WooCommerce store. Automated tools combined with manual checks provide an effective approach to detect malware, vulnerabilities, and suspicious activity promptly.
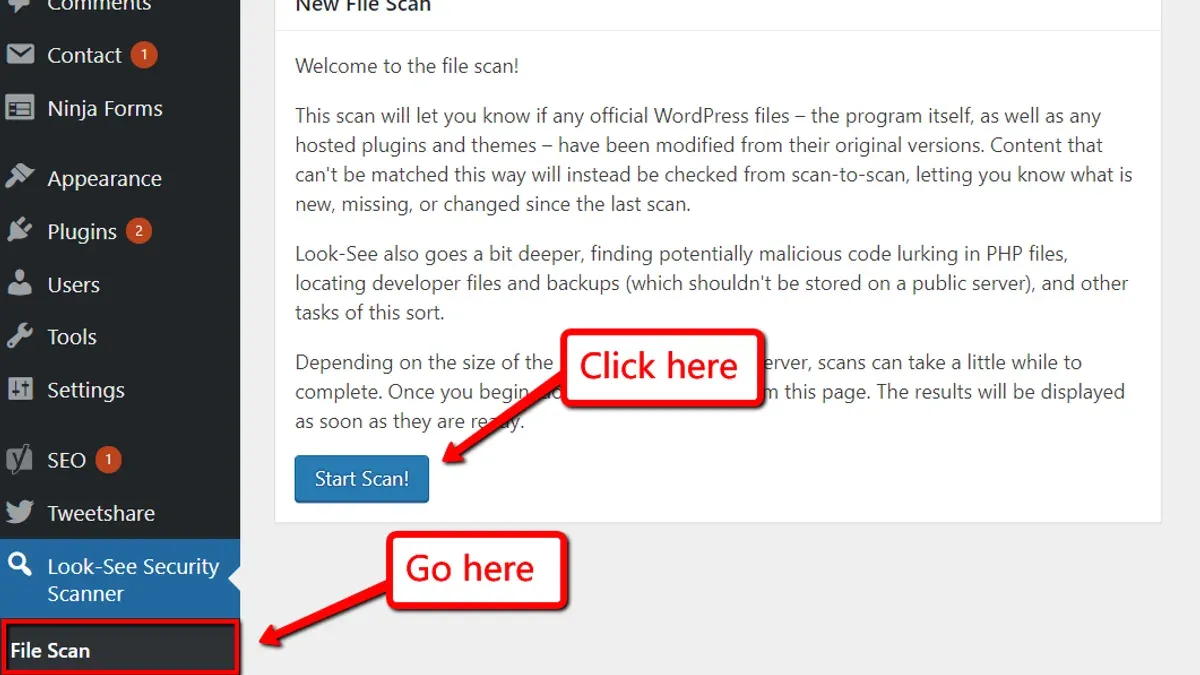
Setting up malware and vulnerability scanners
- Choose a reputable security plugin with vulnerability scanning features, such as Wordfence, Sucuri, or MalCare. Upon activation, navigate to the plugin’s dashboard and enable scheduled scans set to run daily or weekly. The plugin should clearly display scan progress and results.
- Configure the scanner to include all WooCommerce directories, especially /wp-content/plugins/woocommerce/ and /wp-content/uploads/, where malware may hide. A thorough scan will identify known malicious code, outdated files, or suspicious changes.
- Integrate external scanning services like VirusTotal or WPScan for an additional layer of vulnerability detection. These tools provide detailed reports on plugin and theme weaknesses.
Interpreting scan results and taking corrective action
Scan reports typically categorize findings by severity (critical, warning, informational). Immediate attention is required for critical issues such as injected malicious scripts or compromised files.
Upon detection of a vulnerability, follow these steps:
- Review the affected files and note the reported issue.
- Backup the current site state before making changes.
- Follow recommended remediation steps, which may include deleting infected files, replacing core WooCommerce files with clean versions, or applying security patches.
- Verify the issue is resolved by running a follow-up scan and confirming no further alerts appear in the same category.
Monitoring logs for suspicious activity
Regularly examine server access logs and WooCommerce activity logs for unusual login attempts, unauthorized file changes, or unexpected admin actions. Hosting control panels often provide easy access to these logs.
Set up alerts for repeated failed login attempts or access from suspicious IP addresses to react quickly. Correlating these logs with scan reports helps identify targeted attacks or ongoing breaches.
Integrating monitoring with hosting provider tools
Many hosting providers offer built-in security monitoring and automatic malware scanning. Enable these features via the hosting control panel, ensuring they complement the WooCommerce security plugins in use.
Hosting-level firewalls and intrusion detection systems can block threats before they reach the WooCommerce site, adding an additional security layer.
Sample vulnerability report and remediation timeline:
| Day | Action | Result |
|---|---|---|
| Day 1 | Automated scan detects a suspicious PHP file in /wp-content/uploads/ | Alert generated, file quarantined |
| Day 2 | Site administrator reviews file, confirms malware signature | Backup taken, infected file deleted |
| Day 3 | Follow-up scan shows no further issues; logs reviewed for suspicious access | Site cleared, monitoring intensified |
| Day 7 | Routine scan confirms no reinfection | Normal monitoring resumed |
Tip: Automate scans and log monitoring where possible to reduce manual oversight and catch issues early.
Troubleshooting common WooCommerce security issues
Securing a WooCommerce site can sometimes lead to unexpected problems. This section addresses frequent issues and provides clear steps to resolve them.
Resolving plugin conflicts after security updates
Security updates may cause conflicts between plugins, leading to site errors or broken functionality. Identifying and fixing the problematic plugin restores normal operation.
- Deactivate all non-essential plugins via the WordPress dashboard under Plugins > Installed Plugins. The site should load without errors.
- Reactivate plugins one by one, checking the site after each activation to identify the conflicting plugin.
- Once identified, check the plugin’s support page for compatibility updates or known issues.
- If no fix is available, consider replacing the plugin with an alternative that supports current WooCommerce security standards.
Before: Site shows a white screen or error message after updating security plugins.
After: Site loads normally with only compatible plugins activated.
Fixing SSL mixed content warnings
Mixed content warnings occur when some resources load over HTTP instead of HTTPS, undermining SSL protection.
- Use a tool like the browser console or online SSL checker to identify insecure resource URLs.
- Replace HTTP URLs in WooCommerce settings, theme files, and content with HTTPS versions.
- Install and configure a plugin such as Really Simple SSL to force HTTPS site-wide.
- Clear any caching plugins and browser cache to ensure changes take effect.
Before: Browser displays a padlock warning or insecure content alert.
After: Browser shows a secure padlock with no warnings.
Handling lockouts from login attempt limits
Security plugins often limit login attempts to prevent brute force attacks but may lock out legitimate users.
- Access the hosting control panel or FTP to rename the security plugin’s folder temporarily, disabling it.
- Log in to the WordPress admin dashboard without restrictions.
- Adjust the security plugin settings to increase the allowed number of login attempts or whitelist trusted IP addresses.
- Reactivate the plugin by restoring its original folder name.
Before: Login attempts are blocked with a lockout message.
After: Successful login without lockout after settings adjustment.
Recovering from brute force or DDoS attacks
Such attacks can overwhelm site resources and cause downtime.
- Contact the hosting provider to activate server-level protection like rate limiting or IP blocking.
- Implement a Web Application Firewall (WAF) with WooCommerce-specific rules.
- Temporarily enable maintenance mode in WooCommerce settings to protect customers during recovery.
- Analyze server logs to identify and block malicious IPs.
- After the attack subsides, review and strengthen authentication and firewall settings.
Before: Site is slow or inaccessible due to high traffic from attacks.
After: Site performance returns to normal with malicious traffic blocked.
Further reading
- How to Secure a Shopify Website: A Comprehensive Step-by-Step Guide
- How to Scan a Website for Malware: A Clear Step-by-Step Guide
- How to Get Off the Google Safe Browsing Blacklist: A Step-by-Step Guide
- How to See Devices Connected to Your TP-Link Router and Secure Your Network
Frequently asked questions
What are the most common vulnerabilities in WooCommerce stores?
Common vulnerabilities include outdated plugins and themes, weak authentication methods, and insecure payment processing. Cross-site scripting (XSS) and SQL injection attacks can also target poorly coded extensions. Additionally, improper user role management may expose sensitive data to unauthorized users.
How often should WooCommerce and plugins be updated?
Updates should be applied as soon as they are tested and confirmed compatible, typically within days of release. Regularly checking for updates at least once a week helps protect against newly discovered security flaws. Delaying updates increases the risk of exploits targeting known vulnerabilities.
Can a security plugin slow down my WooCommerce site?
Security plugins can impact site performance depending on their features and server resources. Lightweight solutions focusing on essentials like login protection and firewall rules tend to minimize slowdowns. However, plugins performing extensive scans or real-time monitoring may increase load times, so balancing security needs with performance is key.
What should be done if the WooCommerce site is hacked?
Immediately isolate the site to prevent further damage and notify hosting support. Restore the site from a clean backup prior to the breach. After restoration, change all passwords, update software, review user accounts, and scan for malicious code to identify and close vulnerabilities. Monitoring traffic and transactions closely afterward helps detect residual issues.
Limits of this guide and when to seek expert help
This guide focuses on practical WooCommerce-specific security measures suitable for small to medium store owners and site administrators. It does not cover advanced server-level security configurations such as firewall rules at the network layer, intrusion detection systems, or custom WooCommerce development security practices. Store owners using managed hosting environments or relying heavily on custom code should consult specialized professionals to address those areas comprehensively.
Implementing the recommended steps can significantly reduce common vulnerabilities, but complex security challenges may require tailored solutions beyond this guide’s scope.
The most effective next step is to establish a regular security routine that includes scheduled updates, backups, and vulnerability scans. This ongoing maintenance helps identify emerging risks early and ensures that security remains an active part of store management rather than a one-time setup.